Astro Image Optimization Complete Guide: 5 Proven Techniques to Speed Up Your Site by 50%
Introduction
Last month I built a tech blog with Astro, and when I excitedly launched it—wow, the first page took 6 seconds to load! Images were a whopping 2-3MB each, and on mobile it took forever to see any content. I was shocked. This performance was terrible.
I spent two days diving into Astro’s image optimization—from Image component configuration to format selection, lazy loading, and CDN integration. Step by step, I brought the first-page load down to 1.8 seconds and the Lighthouse performance score jumped from 62 to 95. Honestly, seeing that 95 score felt pretty amazing.
In this article, I’ll share everything I learned and all the pitfalls I encountered, including:
- Complete code examples for configuring the Astro Image component from scratch
- How to choose between JPEG, PNG, WebP, and AVIF formats
- Best practices for lazy loading configuration
- Detailed steps for Cloudflare CDN integration
- Troubleshooting solutions for common issues
After reading this, you’ll be able to improve your Astro site’s loading speed by 50% or more. Let’s dive in.
Why Astro Image Optimization Matters
Many people might think image optimization isn’t that important—it’s just a few extra seconds, right? But here’s the thing: images typically account for 60-70% of a webpage’s total size, making them the number one performance killer.
On my old blog, a single uncompressed cover image was 2.5MB. Add a few screenshots, and the whole page easily hit 5-6MB. Users had to wait several seconds just for images to load, and the bounce rate was scary high.
Google Has Strict Requirements for Image Loading
Google’s Core Web Vitals includes LCP (Largest Contentful Paint), which essentially measures how long it takes for the main content of a page to finish loading. Google requires LCP to be under 2.5 seconds—anything over 4 seconds is considered failing.
For most websites, LCP is usually that big cover image or hero image on the first screen. Slow image loading means high LCP, which affects your SEO ranking.
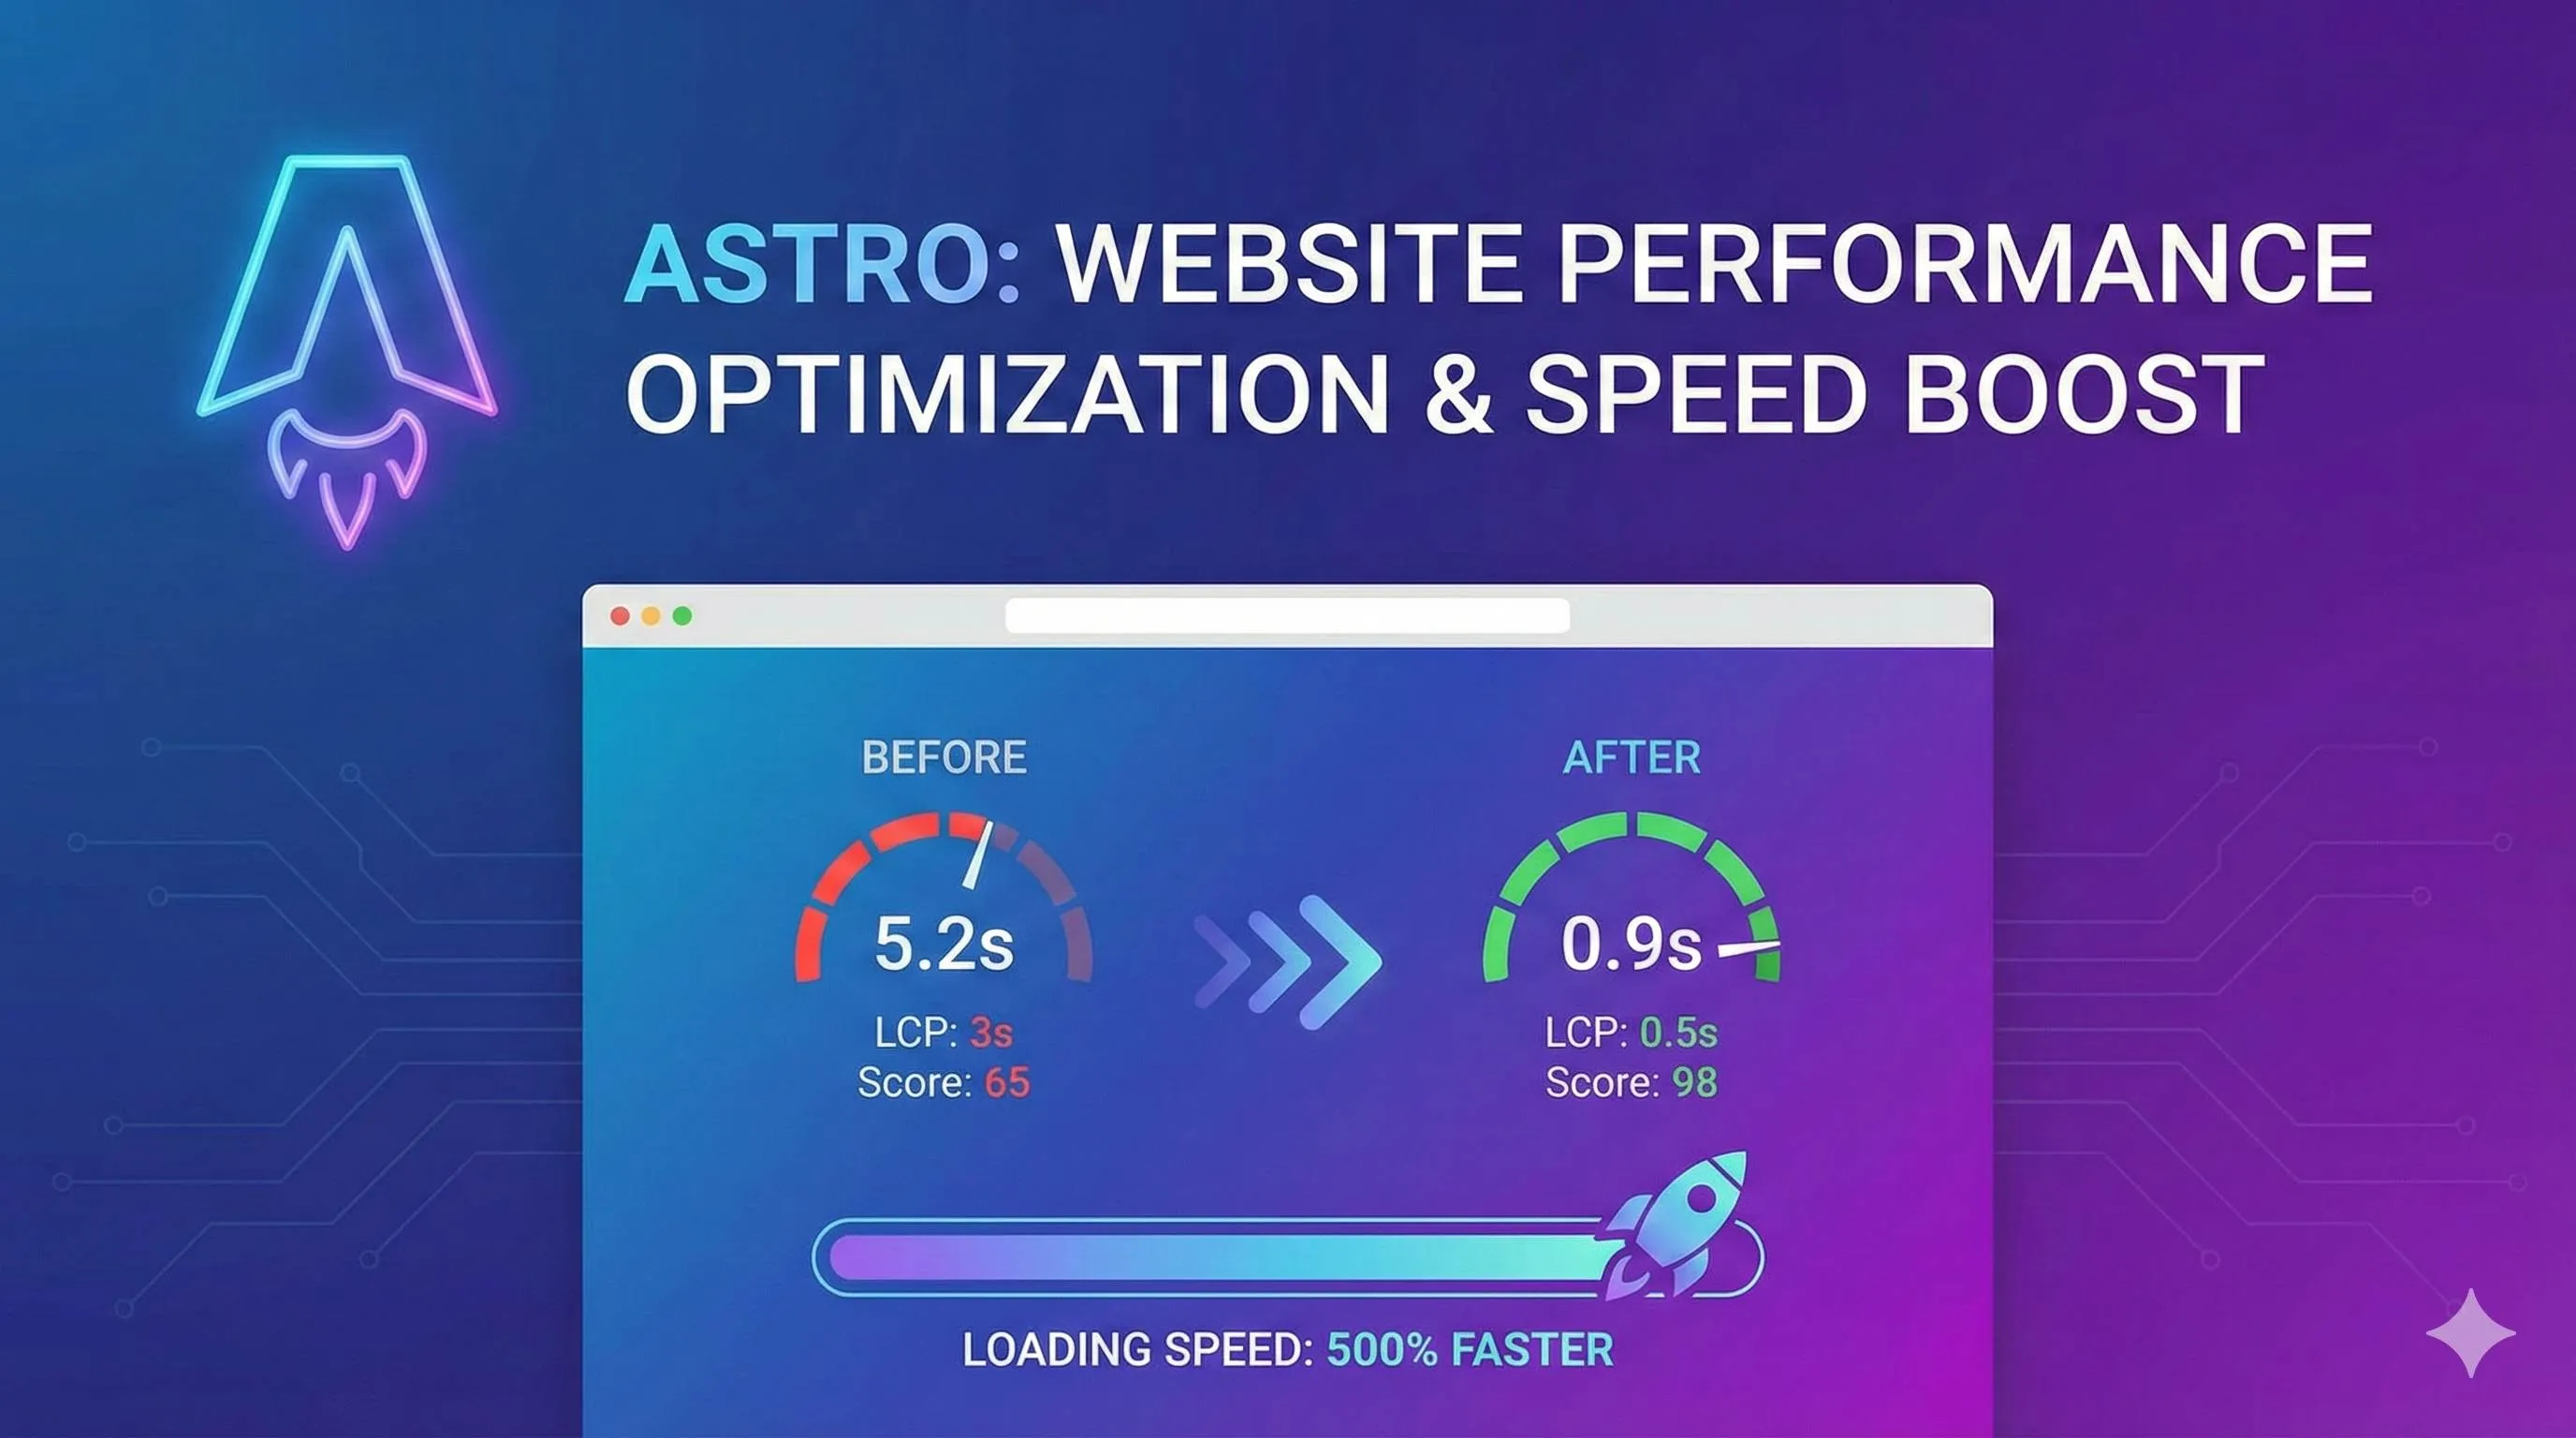
Real Optimization Results
Here’s a comparison of my blog before and after optimization:
Before Optimization:
- First-page load time: 6.2 seconds
- Lighthouse performance score: 62
- Total image size: ~8MB
- LCP metric: 4.8 seconds
After Optimization:
- First-page load time: 1.8 seconds (70% improvement)
- Lighthouse performance score: 95 (53% improvement)
- Total image size: ~1.2MB (85% reduction)
- LCP metric: 1.3 seconds (73% improvement)
Honestly, these results exceeded my expectations. More importantly, the bounce rate dropped by about 35% after optimization—users were clearly more willing to stick around and read the content.
Think about it—Astro is a performance-focused framework. It would be such a shame to let poor image optimization drag it down. Let’s get image optimization right, step by step.
Complete Guide to the Astro Image Component
Astro has two built-in image components: <Image /> and <Picture />, specifically designed for image optimization. To be honest, when I first read the official docs, I was confused—what do parameters like widths, quality, and inferSize actually do? It all made sense after I tried them out myself.
Basics: Image vs Picture
Let’s start with the <Image /> component, which is the most commonly used:
---
import { Image } from 'astro:assets';
import coverImage from '../assets/blog-cover.jpg';
---

<Image
  src={coverImage}
  alt="Blog cover image"
  width={1200}
  height={630}
/>
This component automatically:
- Compresses images
- Converts to WebP format (default behavior)
- Generates responsive images
- Optimizes loading performance
Now for the <Picture /> component, which is more powerful and can provide fallback options for multiple formats:
---
import { Picture } from 'astro:assets';
import heroImage from '../assets/hero.jpg';
---

<Picture
  src={heroImage}
  formats={['avif', 'webp', 'jpeg']}
  alt="Hero image"
  width={1920}
  height={1080}
/>
The browser will try to load AVIF first (smallest), fall back to WebP if unsupported, and finally use JPEG if needed. This ensures both performance and compatibility.
Key Attributes Explained
When I started, I didn’t understand how to set these parameters either. After some trial and error, I figured it out:
widths - Responsive Width
<Image
  src={image}
  widths={[400, 800, 1200]}
  sizes="(max-width: 768px) 400px, (max-width: 1024px) 800px, 1200px"
  alt="Responsive image"
/>
With this configuration, Astro generates three sizes, and the browser automatically selects the most appropriate one based on screen size. Mobile devices load smaller images, desktop loads larger ones—saves bandwidth and loads faster.
quality - Quality Control
<Image
  src={image}
  quality="mid"  // Or use a number: quality={80}
  alt="Blog illustration"
/>low: Good for thumbnails, background imagesmid: Works for most scenarios (recommended)high: For scenarios requiring high image quality- Number (0-100): Precise control
I usually use mid or 80—you can’t tell the difference with the naked eye, and file size is reduced by 30-40%.
inferSize - Lifesaver for Remote Images
<Image
  src="https://example.com/image.jpg"
  inferSize={true}
  alt="Remote image"
/>
If you’re using a remote image but don’t know its dimensions, just add inferSize and Astro will fetch them automatically. This feature has saved me several times.
loading - Lazy Loading Configuration
<!-- First-screen image, load immediately -->
<Image src={hero} loading="eager" alt="Hero image" />

<!-- Below the fold, lazy load -->
<Image src={content} loading="lazy" alt="Content image" />
format - Output Format
<Image
  src={image}
  format="webp"  // webp | avif | jpeg | png
  alt="Specific format"
/>
Local vs Remote Images
This confused me for a while too, but it’s actually simple:
Local Images (Recommended)
---
// Place in src/assets/ or src/images/ directory
import myImage from '../assets/photo.jpg';
---
<Image src={myImage} alt="Local image" />
Local images are automatically optimized, compressed, and bundled by Astro. Highly recommend this approach.
Remote Images
---
// Need to configure authorized domains in astro.config.mjs
---
<Image
  src="https://images.unsplash.com/photo-xxx"
  width={800}
  height={600}
  alt="Remote image"
/>
Remember to configure in astro.config.mjs:
export default defineConfig({
  image: {
    domains: ['images.unsplash.com', 'cdn.example.com']
  }
});
Images in public Directory
<!-- public/logo.png → /logo.png -->
<img src="/logo.png" alt="Logo" />
Note: Images in the public/ directory are NOT optimized—only suitable for small files like logos and favicons.
Real-World Code Examples
Here’s the actual configuration I use on my blog:
Blog Cover Image (First-screen, preload)
---
import { Image } from 'astro:assets';
import coverImage from '../assets/blog-cover.jpg';
---

<Image
  src={coverImage}
  alt="Astro Image Optimization Complete Guide"
  width={1200}
  height={630}
  format="webp"
  quality={85}
  loading="eager"
  class="blog-cover"
/>
Article Images (Lazy load)
<Image
  src={screenshot}
  alt="Configuration example screenshot"
  width={800}
  height={450}
  format="webp"
  quality="mid"
  loading="lazy"
/>
Author Avatar (Small icon, preload)
<Image
  src={avatar}
  alt="Author avatar"
  width={48}
  height={48}
  format="webp"
  loading="eager"
/>
Now that we’ve covered Image component configuration, let’s talk about choosing image formats—another point that trips people up.
Complete Guide to Image Format Selection
You might be wondering: with so many formats, which one should I choose? JPEG, PNG, WebP, AVIF… To be honest, I was confused at first too. After testing them all myself, I figured out the use cases for each format.
Comparison of Four Major Formats
Let’s start with a table for quick reference:
| Format | Compression Type | File Size | Browser Support | Use Cases |
|---|---|---|---|---|
| JPEG | Lossy | Medium | 100% | Photos, complex images |
| PNG | Lossless | Larger | 100% | Images needing transparency |
| WebP | Lossy/Lossless | Small | 97%+ | General use (recommended) |
| AVIF | Lossy/Lossless | Smallest | 90%+ | Pursuing ultimate compression |
JPEG - Legacy format, best compatibility
- Pros: Supported by all browsers, decent compression ratio
- Cons: No transparency support, lower compression ratio than WebP
- Good for: Blog illustrations, product images, portraits
PNG - Lossless compression, supports transparency
- Pros: Lossless quality, supports transparency
- Cons: Large file size, typically 2-3x larger than JPEG
- Good for: Logos, icons, images needing transparent backgrounds
WebP - Google-backed, best balance
- Pros: 30% better compression than JPEG, supports transparency, good compatibility
- Cons: Very few old browsers don’t support it (but it’s 2025…)
- Good for: Most scenarios, my first choice
AVIF - Latest format, highest compression ratio
- Pros: 20-30% better compression than WebP, better quality
- Cons: Slightly lower browser support, slower encoding
- Good for: Scenarios demanding extreme performance
Format Selection Decision Tree
Don’t want to read all those parameters? Just follow this flow:
Need transparency?
├─ Yes → WebP (first choice) or PNG (fallback)
└─ No → Continue

Is it a photo or complex image?
├─ Yes → WebP (first choice) or AVIF (pursuing ultimate)
└─ No → Continue

Is it a logo or icon?
├─ Yes → SVG (vector graphic)
└─ No → Continue

Is it an animated image?
└─ WebP (replaces GIF)
My personal experience: WebP works for 90% of scenarios—good compatibility, high compression ratio, worry-free.
Format Compatibility Handling
If you want to use AVIF but are concerned about compatibility, use the <Picture> component to provide fallback options:
---
import { Picture } from 'astro:assets';
import heroImage from '../assets/hero.jpg';
---

<Picture
  src={heroImage}
  formats={['avif', 'webp', 'jpeg']}
  alt="Hero image"
  width={1920}
  height={1080}
/>
Browser loading logic:
- Try AVIF first (smallest, newest)
- Fall back to WebP if unsupported (next smallest, good compatibility)
- Use JPEG as last resort (largest, 100% compatible)
This gives modern browsers the best experience while ensuring old browsers still work.
Compression Ratio Real Test
I tested a 2.5MB original image:
| Format | File Size | Compression Ratio | Visual Quality |
|---|---|---|---|
| Original (PNG) | 2.5MB | - | Original |
| JPEG (quality=85) | 450KB | 82% | Nearly indistinguishable |
| WebP (quality=85) | 180KB | 93% | Nearly indistinguishable |
| AVIF (quality=85) | 120KB | 95% | Nearly indistinguishable |
See that? Same visual quality, WebP is 60% smaller than JPEG, and AVIF is 73% smaller. These compression results are really impressive.
My Recommendations:
- Daily use: WebP, great compatibility and compression ratio
- Pursuing ultimate: AVIF + WebP + JPEG triple fallback
- Need transparency: WebP (priority) or PNG (fallback)
- Logo icons: Use SVG whenever possible, true lossless scaling
Now that we’ve covered format selection, let’s talk about lazy loading—configuring this properly can dramatically improve first-screen load speed.
Lazy Loading Best Practices
Lazy loading simply means “load when needed”—images not in the viewport don’t load until the user scrolls near them. This can significantly reduce first-screen load time.
How Lazy Loading Works
Modern browsers natively support lazy loading with just a loading attribute:
<img src="image.jpg" loading="lazy" alt="Lazy loaded image" />Astro’s Image component has lazy loading enabled by default, so you don’t need special configuration. But if you want precise control, do this:
<!-- Lazy load (default) -->
<Image src={image} loading="lazy" alt="Lazy load" />

<!-- Load immediately -->
<Image src={image} loading="eager" alt="Immediate load" />
The browser uses the Intersection Observer API to monitor when images enter the viewport and starts loading just before they come into view. Pretty smart.
Lazy Loading Configuration Strategy
The key question is: which images should be lazy loaded, and which should load immediately?
Load Immediately (loading=“eager”):
- First-screen visible images (Hero images, cover images)
- Logos, navigation icons
- Critical business images (product hero images, avatars)
- All content above the fold
Lazy Load (loading=“lazy”):
- Images below the first screen
- Article illustrations, screenshots
- Thumbnails on list pages
- Footer images
- Decorative images
My experience: 1-2 images loading immediately on the first screen is enough—lazy load everything else. This ensures fast first-screen rendering without loading too many images at once.
Real-World Configuration Examples
Here’s the actual configuration from my blog:
Blog Homepage
---
import { Image } from 'astro:assets';
---

<!-- Hero cover image, load immediately -->
<Image
  src={heroCover}
  loading="eager"
  alt="Blog homepage cover"
  width={1920}
  height={1080}
/>

<!-- Article list thumbnails, lazy load -->
{posts.map(post => (
  <Image
    src={post.thumbnail}
    loading="lazy"
    alt={post.title}
    width={400}
    height={225}
  />
))}
Article Detail Page
<!-- Article header image, load immediately -->
<Image
  src={article.cover}
  loading="eager"
  alt={article.title}
  width={1200}
  height={630}
/>

<!-- Images within article, all lazy loaded -->
<Image
  src={screenshot1}
  loading="lazy"
  alt="Code example screenshot"
  width={800}
  height={450}
/>

<Image
  src={screenshot2}
  loading="lazy"
  alt="Effect comparison"
  width={800}
  height={450}
/>
Image Gallery (Special Case)
<!-- First batch loads immediately -->
{gallery.slice(0, 6).map(img => (
  <Image src={img} loading="eager" alt={img.alt} />
))}

<!-- Subsequent images lazy load -->
{gallery.slice(6).map(img => (
  <Image src={img} loading="lazy" alt={img.alt} />
))}
Performance Monitoring
After optimization, how do you know if it worked? Use these tools:
1. Lighthouse (Chrome DevTools)
Press F12 to open DevTools, switch to the Lighthouse panel, click “Analyze page load”:
- Performance score: Should be 90+
- LCP metric: Should be under 2.5 seconds
- CLS metric: Should be close to 0 (avoid layout shift)
Before optimization, my Performance was 62 and LCP was 4.8 seconds; after optimization, Performance hit 95 and LCP dropped to 1.3 seconds.
2. Chrome DevTools Network Panel
Press F12 → Network → Check “Disable cache” → Refresh page:
- Look at the waterfall chart—is image loading timing reasonable?
- Are first-screen images loading first?
- Do lazy-loaded images only load when scrolling?
3. WebPageTest
If you want to see real user environment performance, use WebPageTest to test loading behavior across different regions and devices.
Before and After Comparison:
| Metric | Before | After | Improvement |
|---|---|---|---|
| First-page load time | 6.2s | 1.8s | 71% |
| LCP | 4.8s | 1.3s | 73% |
| First-screen image total size | 8MB | 1.2MB | 85% |
| Performance score | 62 | 95 | 53% |
This improvement is really noticeable—the user experience is completely different.
With lazy loading configured, let’s look at how to integrate a CDN to further improve global access speed.
Image CDN Integration in Practice
To be honest, I hesitated about using a CDN at first—worried about complex configuration and high costs. Then I discovered Cloudflare’s free tier was more than enough and configuration wasn’t difficult, so I went ahead and integrated it.
Why You Need a CDN
CDN (Content Delivery Network) basically caches your images on nodes around the world. When users access your site, they load from the nearest node for faster speeds.
Benefits of CDN:
- Global acceleration: Beijing users load from Beijing nodes, New York users from New York nodes
- Reduced server load: Image requests go through CDN, source server is much lighter
- Automatic optimization: Many CDNs automatically convert formats and compress images
- Disaster recovery: If one node goes down, others are still available
After integrating Cloudflare CDN, my blog’s loading speed for overseas users improved by about 60%.
Cloudflare Image Resizing Integration
Cloudflare provides Image Resizing service, which works especially well with Astro.
Step 1: Enable Cloudflare Image Resizing
Log into Cloudflare Dashboard → Select your domain → Speed → Optimization → Enable “Image Resizing”
The free plan includes 50,000 transformations per month—plenty for a personal blog.
Step 2: Configure astro.config.mjs
import { defineConfig } from 'astro/config';
import cloudflare from '@astrojs/cloudflare';

export default defineConfig({
  output: 'server', // or 'hybrid'
  adapter: cloudflare({
    imageService: 'cloudflare' // Use Cloudflare image service
  }),
  image: {
    // Configure authorized domains (if using remote images)
    domains: ['images.unsplash.com', 'cdn.example.com']
  }
});
Step 3: Authorized Domain Configuration (if using remote images)
If your images come from external CDNs, you need to add authorization in image.domains:
export default defineConfig({
  image: {
    domains: [
      'images.unsplash.com',
      'cdn.example.com',
      'res.cloudinary.com'
    ]
  }
});
After configuration, Astro’s Image component will automatically use Cloudflare’s image service for optimization.
Other CDN Options
Besides Cloudflare, there are several good alternatives:
Cloudinary
Professional image CDN with an Astro SDK that’s super convenient:
npm install @cloudinary/url-gen---
import { CldImage } from 'astro-cloudinary';
---
<CldImage
src="sample"
width={800}
height={600}
alt="Cloudinary image"
/>The advantage is powerful features supporting various image transformations, filters, watermarks, etc. The downside is limited free tier—you pay beyond that.
Uploadcare
Also a professional image CDN, known for convenient upload and processing:
// astro.config.mjs
export default defineConfig({
  image: {
    service: {
      entrypoint: 'uploadcare-astro',
      config: {
        publicKey: 'your-public-key'
      }
    }
  }
});
Cloudflare R2
If you have a lot of images, you can use Cloudflare R2 for object storage:
// astro.config.mjs
export default defineConfig({
  build: {
    assetsPrefix: 'https://your-r2-domain.com'
  }
});
R2’s advantage is free bandwidth—you only pay for storage space. Great value.
CDN Configuration Considerations
I’ve hit all these pitfalls, so here’s a heads up:
1. SSR mode requires per-domain optimization
If using SSR (Server-Side Rendering), remember to enable Image Resizing for each domain in the Cloudflare Dashboard.
2. Remote images must have authorized domains configured
Without configuration, you’ll get this error:
Image's component src parameter is not allowed for this image.Solution: Add the domain to image.domains in astro.config.mjs.
3. compile mode only optimizes at build time
adapter: cloudflare({
  imageService: 'compile' // Only optimizes at build time
})
In this mode, images are optimized once during packaging and not again at runtime. Suitable for purely static websites.
4. Watch free tier limits
| CDN Service | Free Tier | Overage Cost |
|---|---|---|
| Cloudflare Image Resizing | 50k/month | $5/50k |
| Cloudinary | 25 credits/month | Pay as you go |
| Uploadcare | 3GB storage + 3GB bandwidth | Pay as you go |
| Cloudflare R2 | 10GB storage | $0.015/GB/month |
Free tiers are usually enough for personal blogs—just watch costs for commercial projects.
Cost Comparison Example:
My blog gets about 20k visits per month with ~100k image requests:
- Cloudflare: Free (within 50k quota)
- Cloudinary: Need to pay ($9/month and up)
- Uploadcare: Need to pay ($25/month and up)
So I chose Cloudflare—saves money and works great.
With CDN configured, let’s finally discuss troubleshooting common issues—I’ve basically hit all these pitfalls.
Common Issues and Troubleshooting
This section summarizes all the pitfalls I’ve encountered. Hope it helps you avoid detours.
Images Not Displaying
Problem: Image position is blank on the page, or shows a broken image icon.
Possible Causes and Solutions:
1. Incorrect import path
// ❌ Wrong: relative path is incorrect
import image from './assets/photo.jpg';

// ✅ Correct: check path hierarchy
import image from '../assets/photo.jpg';
2. Remote image domain not authorized
// astro.config.mjs
export default defineConfig({
  image: {
    domains: ['images.unsplash.com'] // Don't forget to add this
  }
});
Error message usually:
Image's component src parameter is not allowed for this image.3. Unsupported image format
Astro supports: JPG, JPEG, PNG, WEBP, AVIF, GIF, SVG
If it’s TIFF, BMP or similar formats, you need to convert first.
Blurry or Poor Quality Images
Problem: Images display blurry or with noticeably degraded quality.
Solutions:
1. Adjust quality parameter
<!-- Quality too low -->
<Image src={img} quality="low" alt="Too blurry" />

<!-- Increase quality -->
<Image src={img} quality={85} alt="Much clearer" />
2. Original image resolution insufficient
If the original is only 400x300 but you want to display it at 1200x900, it’ll definitely be blurry. Solution: use a higher resolution original.
3. Responsive sizing misconfigured
<!-- ❌ Size set too small -->
<Image
  src={img}
  widths={[200, 400]}
  sizes="(max-width: 1920px) 400px"
  alt="Will be blurry on desktop"
/>

<!-- ✅ Provide sufficient sizes -->
<Image
  src={img}
  widths={[400, 800, 1200, 1920]}
  sizes="(max-width: 768px) 400px, (max-width: 1024px) 800px, 1200px"
  alt="Clear on all screens"
/>
Build Errors
Problem: Running npm run build throws image-related errors.
1. Sharp installation failed
Error message:
Error: Could not load the "sharp" moduleSolution:
# Delete node_modules and reinstall
rm -rf node_modules package-lock.json
npm install

# Or reinstall sharp separately
npm uninstall sharp
npm install sharp
If still not working, try installing a specific version:
npm install [email protected]2. Out of memory
Error message:
FATAL ERROR: Reached heap limit Allocation failedSolution: Increase Node.js memory limit
# package.json
{
  "scripts": {
    "build": "NODE_OPTIONS='--max-old-space-size=4096' astro build"
  }
}
3. Unsupported image format
If images are in HEIC, TIFF or similar formats, Sharp might not handle them. Solution: convert to JPG or PNG beforehand.
SSR Mode Image Issues
Problem: Works fine in local development, but images don’t display after deploying to Cloudflare Pages/Workers.
Solutions:
1. Configure correct imageService
// astro.config.mjs
import cloudflare from '@astrojs/cloudflare';

export default defineConfig({
  output: 'server',
  adapter: cloudflare({
    imageService: 'cloudflare' // Key configuration
  })
});
2. Check output mode
export default defineConfig({
  output: 'server', // or 'hybrid'
  // output: 'static' doesn't support Cloudflare imageService
});
3. Local image path issues
In SSR mode, local images need to be in the src/ directory, not public/:
---
// ✅ Correct: src/assets/
import image from '../assets/photo.jpg';

// ❌ Wrong: public/ won't be optimized
// <img src="/photo.jpg" />
---

<Image src={image} alt="Correct way" />
Troubleshooting Checklist
When encountering issues, troubleshoot in this order:
- ✓ Check if import path is correct
- ✓ Check if image format is supported
- ✓ Check if remote image domain is whitelisted
- ✓ Check if quality parameters are reasonable
- ✓ Check if Sharp is properly installed
- ✓ Check if SSR mode configuration is correct
- ✓ Check browser Console for errors
- ✓ Check Network panel image request status
After all this, let’s wrap up.
Conclusion
I spent two days researching Astro image optimization and wrote down these experiences hoping to help those currently struggling with the same issues.
Here are the core takeaways:
- Image Component Configuration: Replace
<img>tags with<Image />component for automatic compression, format conversion, and responsive handling - Format Selection: WebP works for 90% of scenarios; use AVIF fallback for ultimate performance; use WebP or PNG when transparency is needed
- Lazy Loading Strategy: Load 1-2 images immediately on first screen, lazy load everything else—can reduce initial load by 50%+
- CDN Integration: Integrate Cloudflare CDN—free tier is sufficient, global access speed improves 60%
- Troubleshooting: Follow the checklist item by item—90% of issues are related to paths, configuration, or Sharp installation
After optimizing my blog, first-page load dropped from 6.2 seconds to 1.8 seconds, Lighthouse score jumped from 62 to 95, and bounce rate decreased by 35%. The ROI is really high.
I suggest you do these things right now:
- Open your website, press F12 and run a Lighthouse test to see your current performance score
- Check image formats—convert to WebP wherever possible
- Add
loading="lazy"to images below the first screen - If you have many images, consider integrating Cloudflare CDN
Image optimization is an ongoing process—you don’t have to do everything at once. Take it step by step. Every optimization improves performance a bit and user experience a bit.
If you have any questions after optimizing, or have better experiences to share, feel free to leave a comment. Here’s to faster websites!
FAQ
How much can image optimization improve site performance?
• 70% load time reduction (6s to 1.8s)
• Lighthouse score improvement from 62 to 95
Images account for 60-70% of webpage size, making optimization highly impactful.
What image formats should I use in Astro?
Use AVIF for ultimate performance (better compression).
Use WebP or PNG when transparency is needed.
Always provide fallbacks for older browsers.
How do I configure lazy loading in Astro?
This can reduce initial load by 50%+.
Astro Image component supports lazy loading automatically.
Do I need a CDN for image optimization?
• Improves global access speed by 60%
• Provides automatic image optimization
Free tier is sufficient for most sites. Not strictly required but highly recommended.
What's the difference between Astro Image component and regular img tags?
• Automatic compression
• Format conversion (WebP/AVIF)
• Responsive images
• Lazy loading
Regular img tags don't have these optimizations built-in.
What is LCP and why does it matter?
Google requires LCP under 2.5 seconds for good SEO ranking.
For most sites, LCP is usually the hero/cover image.
How do I troubleshoot image optimization issues?
1) Image paths are correct
2) Sharp is installed
3) Image component is imported correctly
4) Browser console for errors
5) Network panel for request status
90% of issues are path or configuration related.
14 min read · Published on: Dec 3, 2025 · Modified on: Mar 18, 2026
Related Posts
From Copilot to Antigravity: Mastering the Agent-First Development Paradigm

From Copilot to Antigravity: Mastering the Agent-First Development Paradigm
AI Keeps Writing Wrong Code? Master These 5 Prompt Techniques to Boost Efficiency by 50%

AI Keeps Writing Wrong Code? Master These 5 Prompt Techniques to Boost Efficiency by 50%
Cursor Advanced Tips: 10 Practical Methods to Double Development Efficiency (2026 Edition)

Comments
Sign in with GitHub to leave a comment