Complete Guide to Extending Veo 3 Videos: Breaking the 8-Second Limit for 1+ Minute Professional Videos
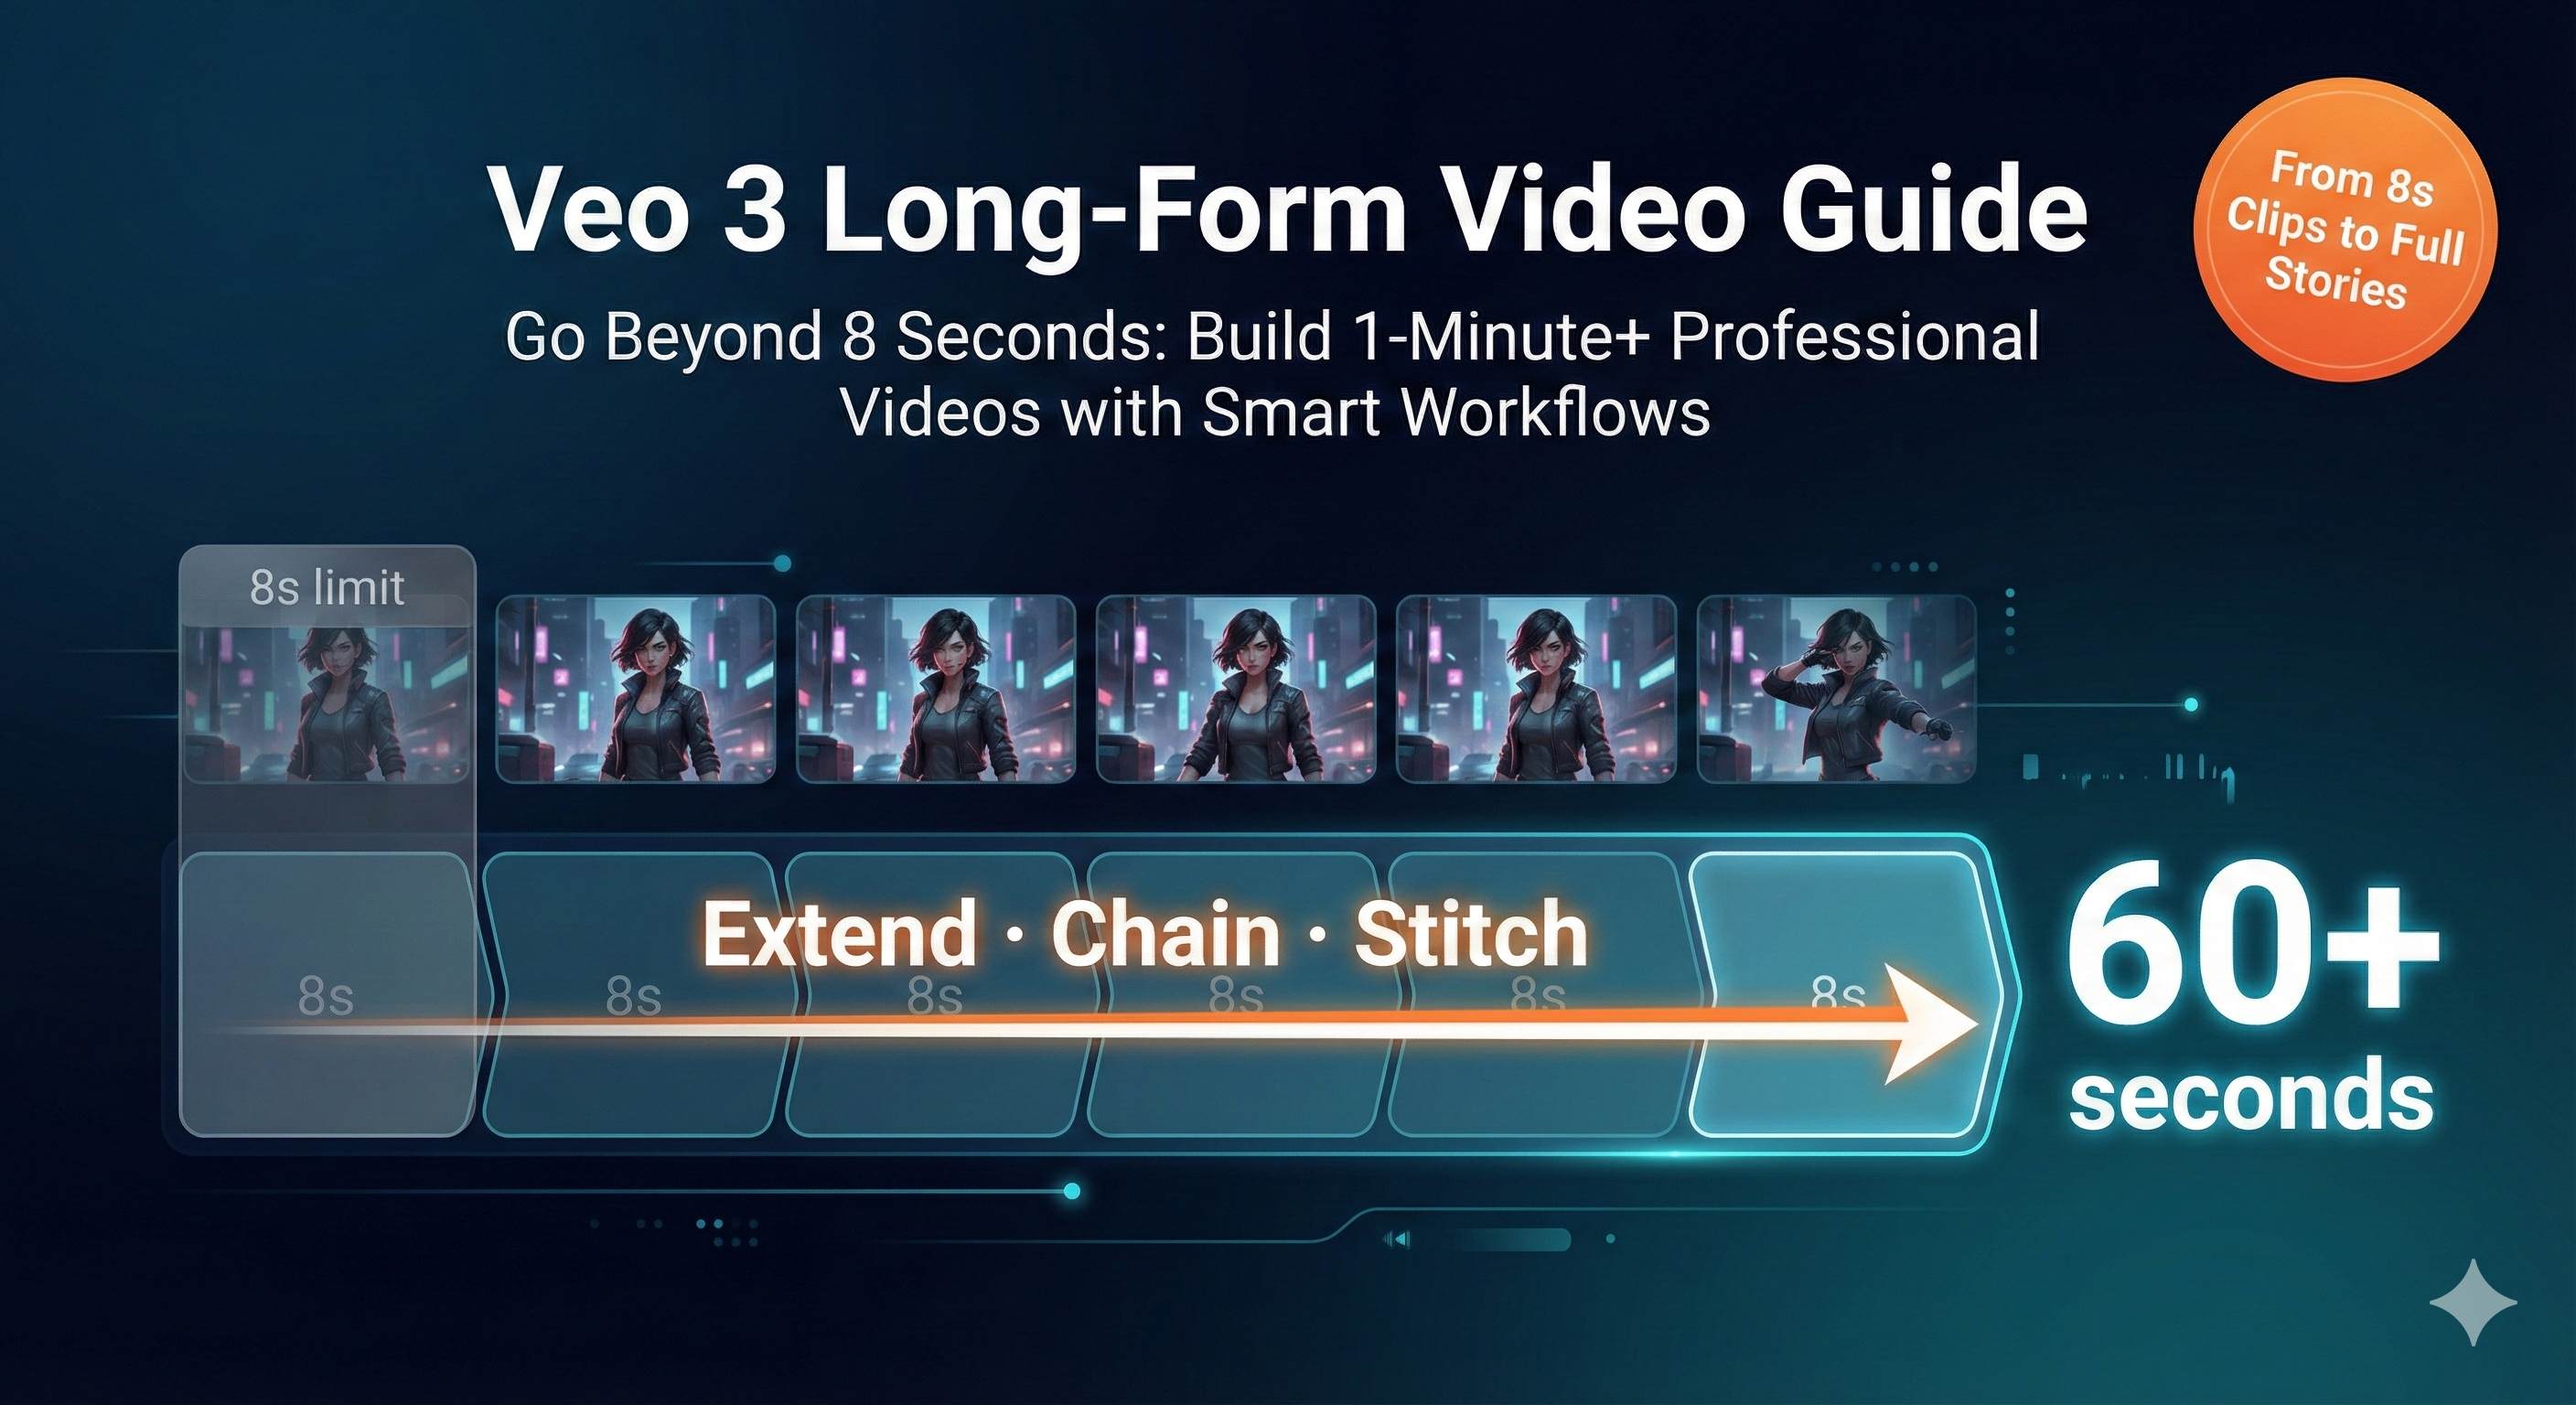
1 AM. I’m staring at the sixth 8-second video clip I just generated, barely able to keep my eyes open. My client needs a 45-second product demo, and I’ve already spent a full hour burning through 6 credits. When I stitched everything together, the protagonist’s outfit changed colors and the background jumped from indoors to outdoors. Honestly, I was ready to throw my laptop out the window.
Sound familiar? You spend several credits generating 5-6 eight-second clips, only to find your character looks completely different when you piece them together? To be honest, when I first started using Veo 3, the 8-second limitation drove me crazy too. But after weeks of intensive testing, I’ve figured out three reliable methods to extend 8-second videos to 1 minute or longer while maintaining character consistency.
Why Veo 3 Only Generates 8 Seconds
Let’s talk about why this limitation exists. It’s not Google being difficult—it’s an architectural tradeoff. To deliver exceptional generation quality and audio effects, Veo 3 must balance processing time, resource consumption, and output quality. You can choose 4, 6, or 8 seconds, but nothing longer.
What’s even more frustrating is that while there’s an “Extend” button in the interface, clicking it automatically switches you to Veo 2 Fast—no audio, and significantly lower quality than Veo 3. That’s why you see people complaining on Reddit and TikTok: “I just want Veo 3 quality, why force me to downgrade to Veo 2?”
To be honest, Google might natively support longer videos in future releases, but for now, we need to figure out workarounds ourselves.
Three Methods for Video Extension Explained
Method 1: Flow Scene Builder + Frames-to-Video Workflow (Most Recommended)
This is my go-to method, perfect when you need to maintain Veo 3’s high quality and complete audio. The process is slightly more involved, but the results are the most stable.
Step-by-Step Process:
Generate Initial Segment: Generate your first 8-second clip in Google Flow, making sure to select “Highest Quality” (that’s Veo 3).
Save the Last Frame: After the video generates, drag the playback cursor to the last frame and click the ”+” to save it as an asset. This step is crucial—it becomes the starting point for your next segment.
Switch to Frames-to-Video: Click “Frames to Video” mode and upload the last frame you just saved.
Repeat Character Description: This is the most overlooked yet most critical step. You MUST completely repeat all character descriptions from the first video—appearance, clothing, background, lighting, atmosphere, even sound effects. Don’t try to simplify or rephrase; just copy and paste verbatim.
For example, if your first segment’s prompt was:
“A 35-year-old Asian woman with long black hair, wearing a white blouse and blue jeans, standing in a modern office with natural daylight, smiling warmly.”
Your second segment must continue with this exact description, just adding new actions:
“A 35-year-old Asian woman with long black hair, wearing a white blouse and blue jeans, standing in a modern office with natural daylight, turning to face the camera.”
Add to Timeline: Once generated, click “Add to Scene” to add the new segment to your timeline.
Trim Transitions: There might be 1-2 frames of overlap between segments. Use the editing tool to trim slightly and create smooth transitions.
Repeat Extension: Repeat steps 2-6 until you reach your desired length.
Important Notes:
- Never return to the asset library page during generation—it might interrupt the process.
- Every Frames-to-Video generation must include complete character descriptions, or you’ll experience “character drift.” I tried cutting corners by simplifying descriptions once, and my protagonist’s hairstyle changed from long to short.
- Check consistency after each extension. If it drifts too far, adjust immediately rather than waiting until you’ve generated 10 segments and everything’s gone haywire.
Pros: Maintains Veo 3’s highest quality and complete audio support.
Cons: Requires manual operation, which is time-consuming.
Method 2: Gemini API Automatic Extension (Most Efficient)
If you need to quickly generate longer videos (up to 2.5 minutes) and have some programming skills, this method is a game-changer.
Basic Principle:
After generating the initial video via Gemini API, use the “extend” parameter to add 7 seconds at a time, up to 20 extensions for a total of 148 seconds. The entire process is automated—no manual frame saving or image uploading required.
Operation Steps:
- Apply for an API key in Google AI Studio (free accounts get daily quotas).
- Use the following code to generate the initial video via API:
import google.generativeai as genai

genai.configure(api_key='YOUR_API_KEY')

prompt = "A cat playing piano in a cozy living room"
video = genai.generate_video(prompt=prompt, duration=8)

# Extend video
for i in range(10):  # Extend 10 times for approximately 80 seconds total
    video = genai.extend_video(video, duration=7)
Technical Details:
- Each extension adds 7 seconds, no more.
- The API automatically references visual and text information from the previous segment during extension.
- Monitor your API quota to avoid exceeding limits.
Pros: Highly automated, suitable for batch generation, saves massive amounts of manual work.
Cons: Requires programming skills, API has usage quotas, free accounts may run out quickly.
Method 3: External Video Editing Tool Stitching (Most Flexible)
If you need refined post-production or want to integrate multiple different scenes into a complete video, it’s time to bring in professional editing tools.
Tool Comparison:
| Tool | Features | Best For | Price |
|---|---|---|---|
| CapCut | AI subtitles, rich sound library, one-click export | Quick output without complex editing | Free |
| Premiere Pro 2025 | Professional-grade, AI smart editing, multilingual subtitles | Refined production, cinematic-quality results | Subscription |
| DaVinci Resolve | Powerful color grading, free professional tool | Limited budget but need professional features | Free + Paid versions |
Stitching Best Practices:
- Use Fade Transitions: Add 0.5-second cross-fades at connection points to significantly reduce jarring transitions.
- AI Audio Matching: CapCut has a “beat sync” feature that automatically syncs visuals to music rhythm, masking subtle differences between segments.
- Add Background Music: Continuous BGM greatly enhances the video’s cohesiveness, making viewers less likely to notice segment stitching.
You might be wondering: which method should I choose?
- If you prioritize quality and have time for refinement, use Method 1.
- If you code and need batch generation, use Method 2.
- If you need high creative freedom in post-production, use Method 3.
It’s really not that complicated. I often combine approaches—use Method 1 to generate high-quality segments, then use CapCut for detailed stitching and sound design.
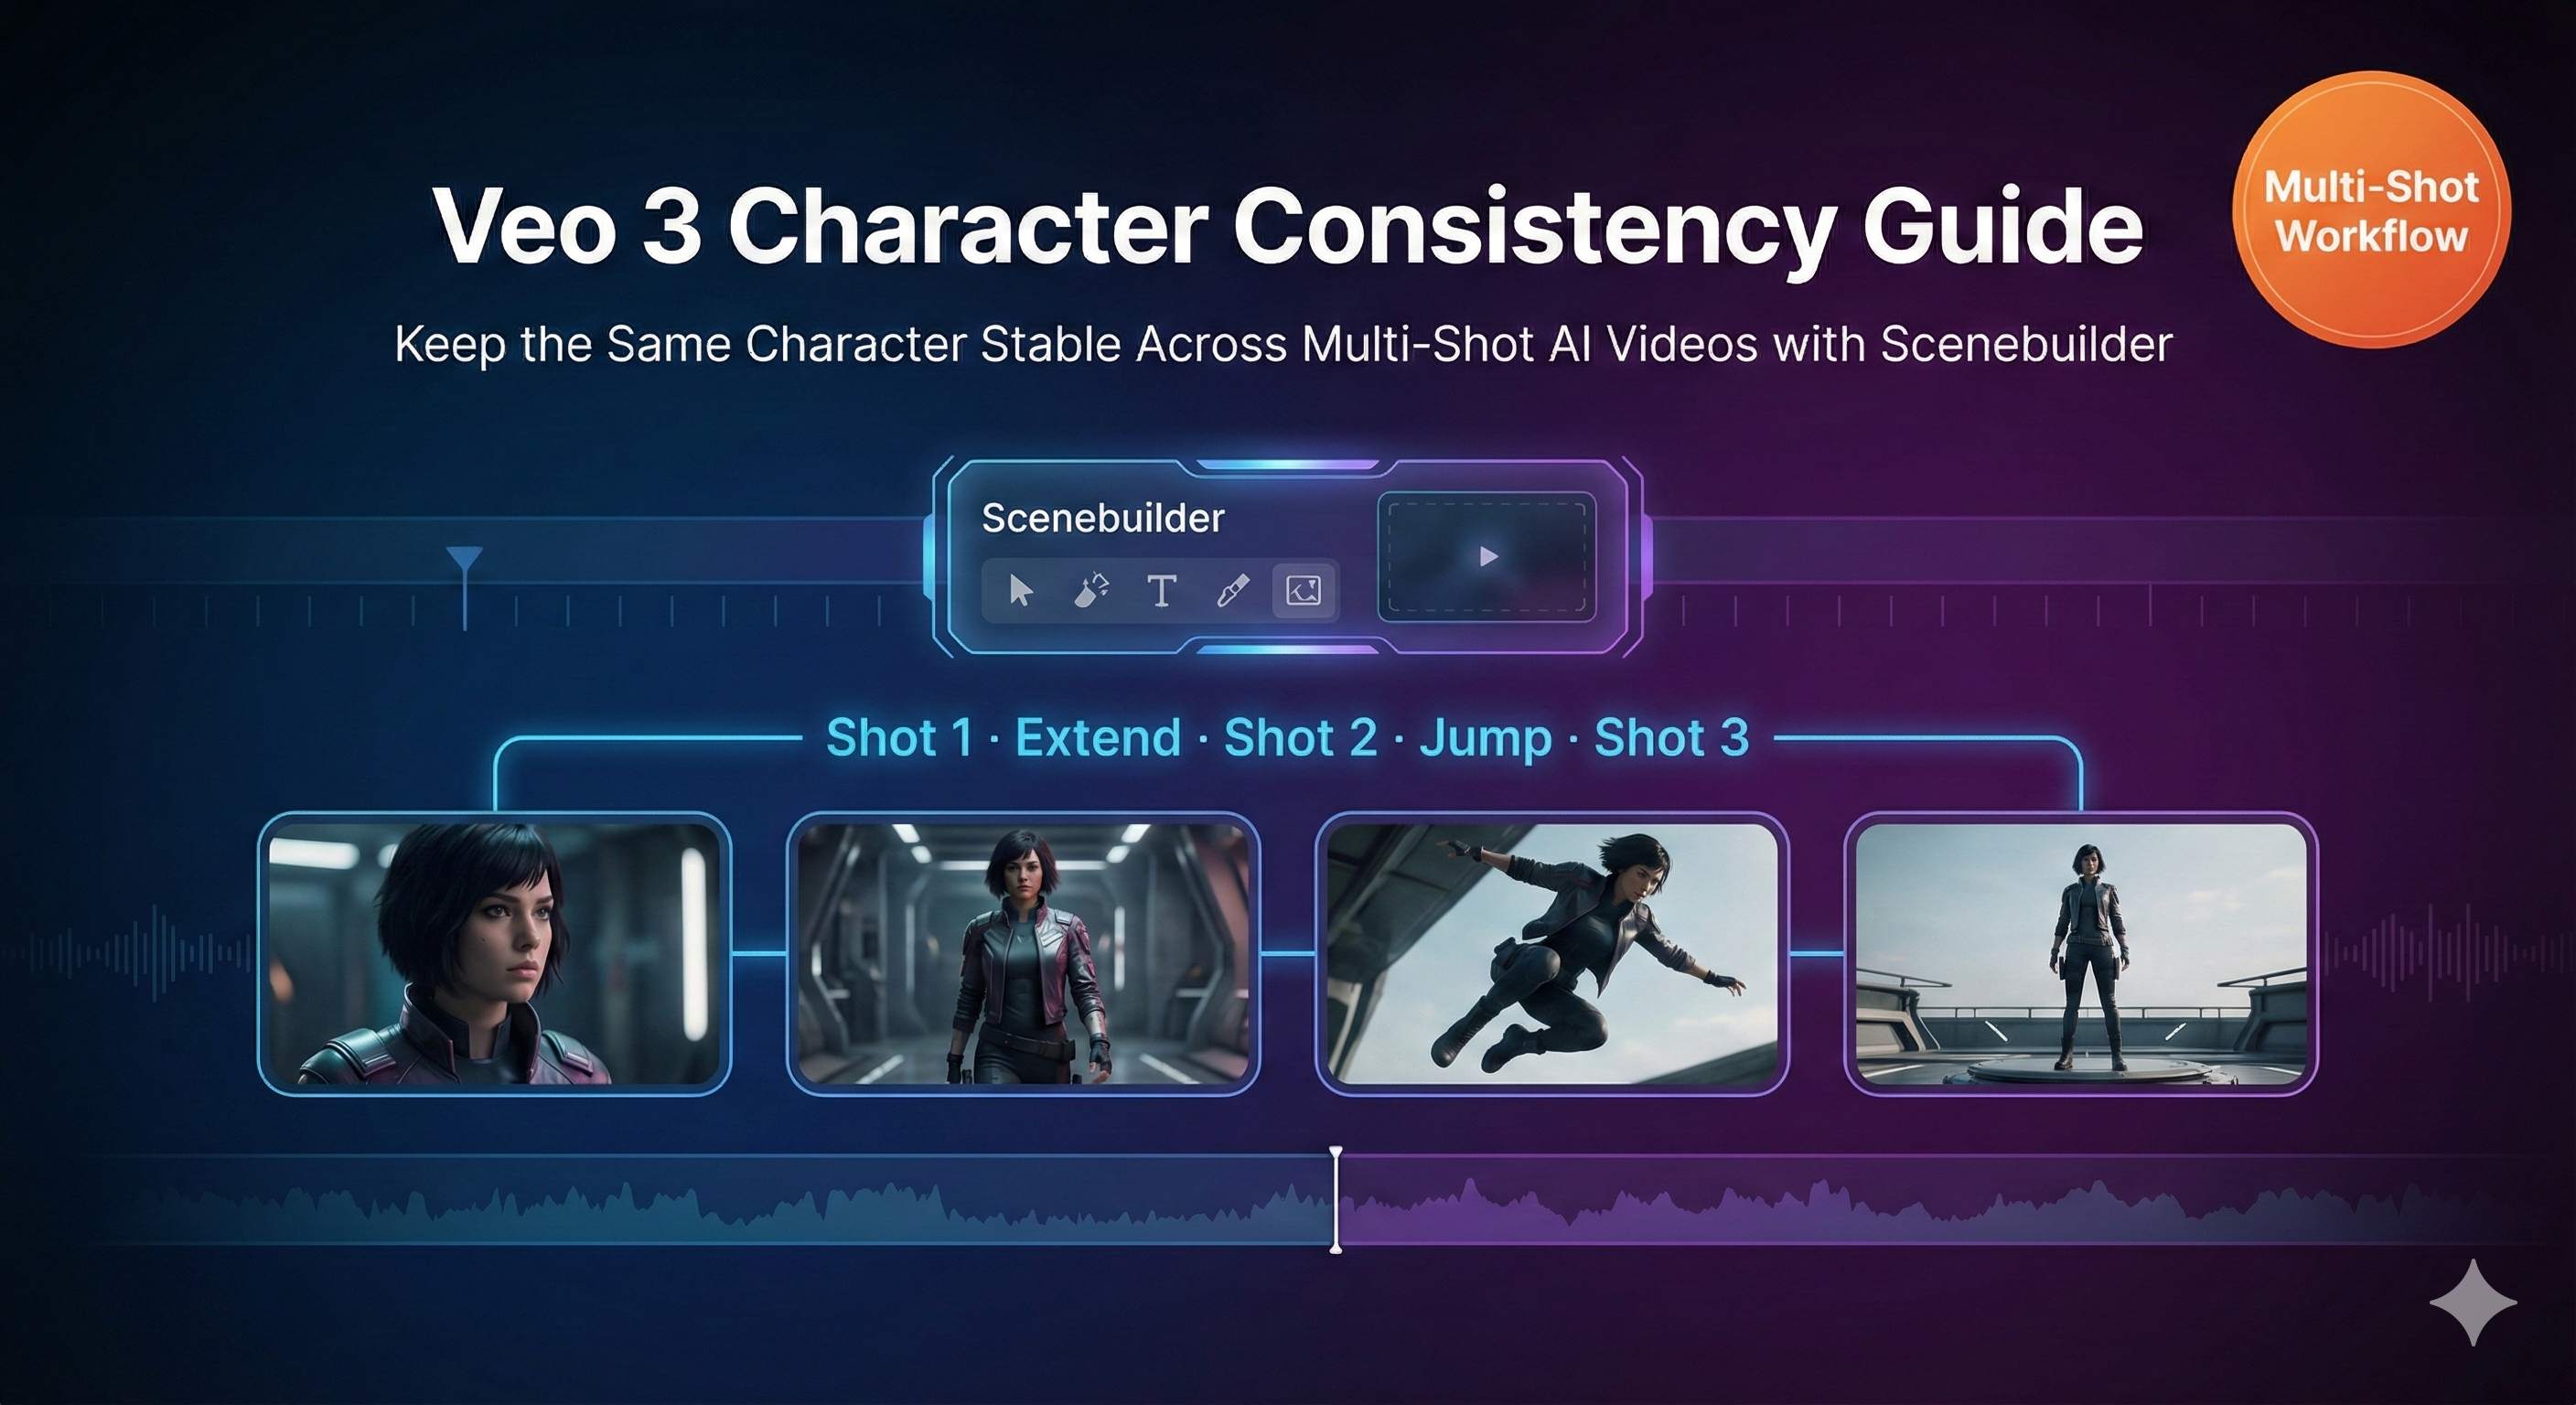
6 Practical Tips for Maintaining Character Consistency
Now that we’ve covered extension methods, let’s tackle the most frustrating issue—keeping characters consistent across segments. When I first started with Veo 3, I’d generate 5 segments and end up with 3 different people. I seriously wondered if the AI had amnesia. After studying countless examples, I’ve distilled these 6 techniques:
Tip 1: Create a Character Bible
This is the first thing I do for every project now. Use a document to record detailed character information:
- Age, gender, skin tone
- Hairstyle, color, length
- Clothing (specific colors and styles)
- Accessories (glasses, necklaces, watches, etc.)
- Facial features (smile, gaze)
- Background environment
Key Point: Every time you generate a new segment, paste this entire description block without simplification or rewording. AI is surprisingly sensitive to details—“white shirt” and “white top” might register as two different garments.
Tip 2: Leverage Scene Builder Features
Flow’s “Add to Scene” feature makes Veo 3 reference the previous segment’s visual information, significantly improving consistency success rates. I’ve tested this dozens of times—using this feature improves consistency by at least 50% compared to generating isolated segments.
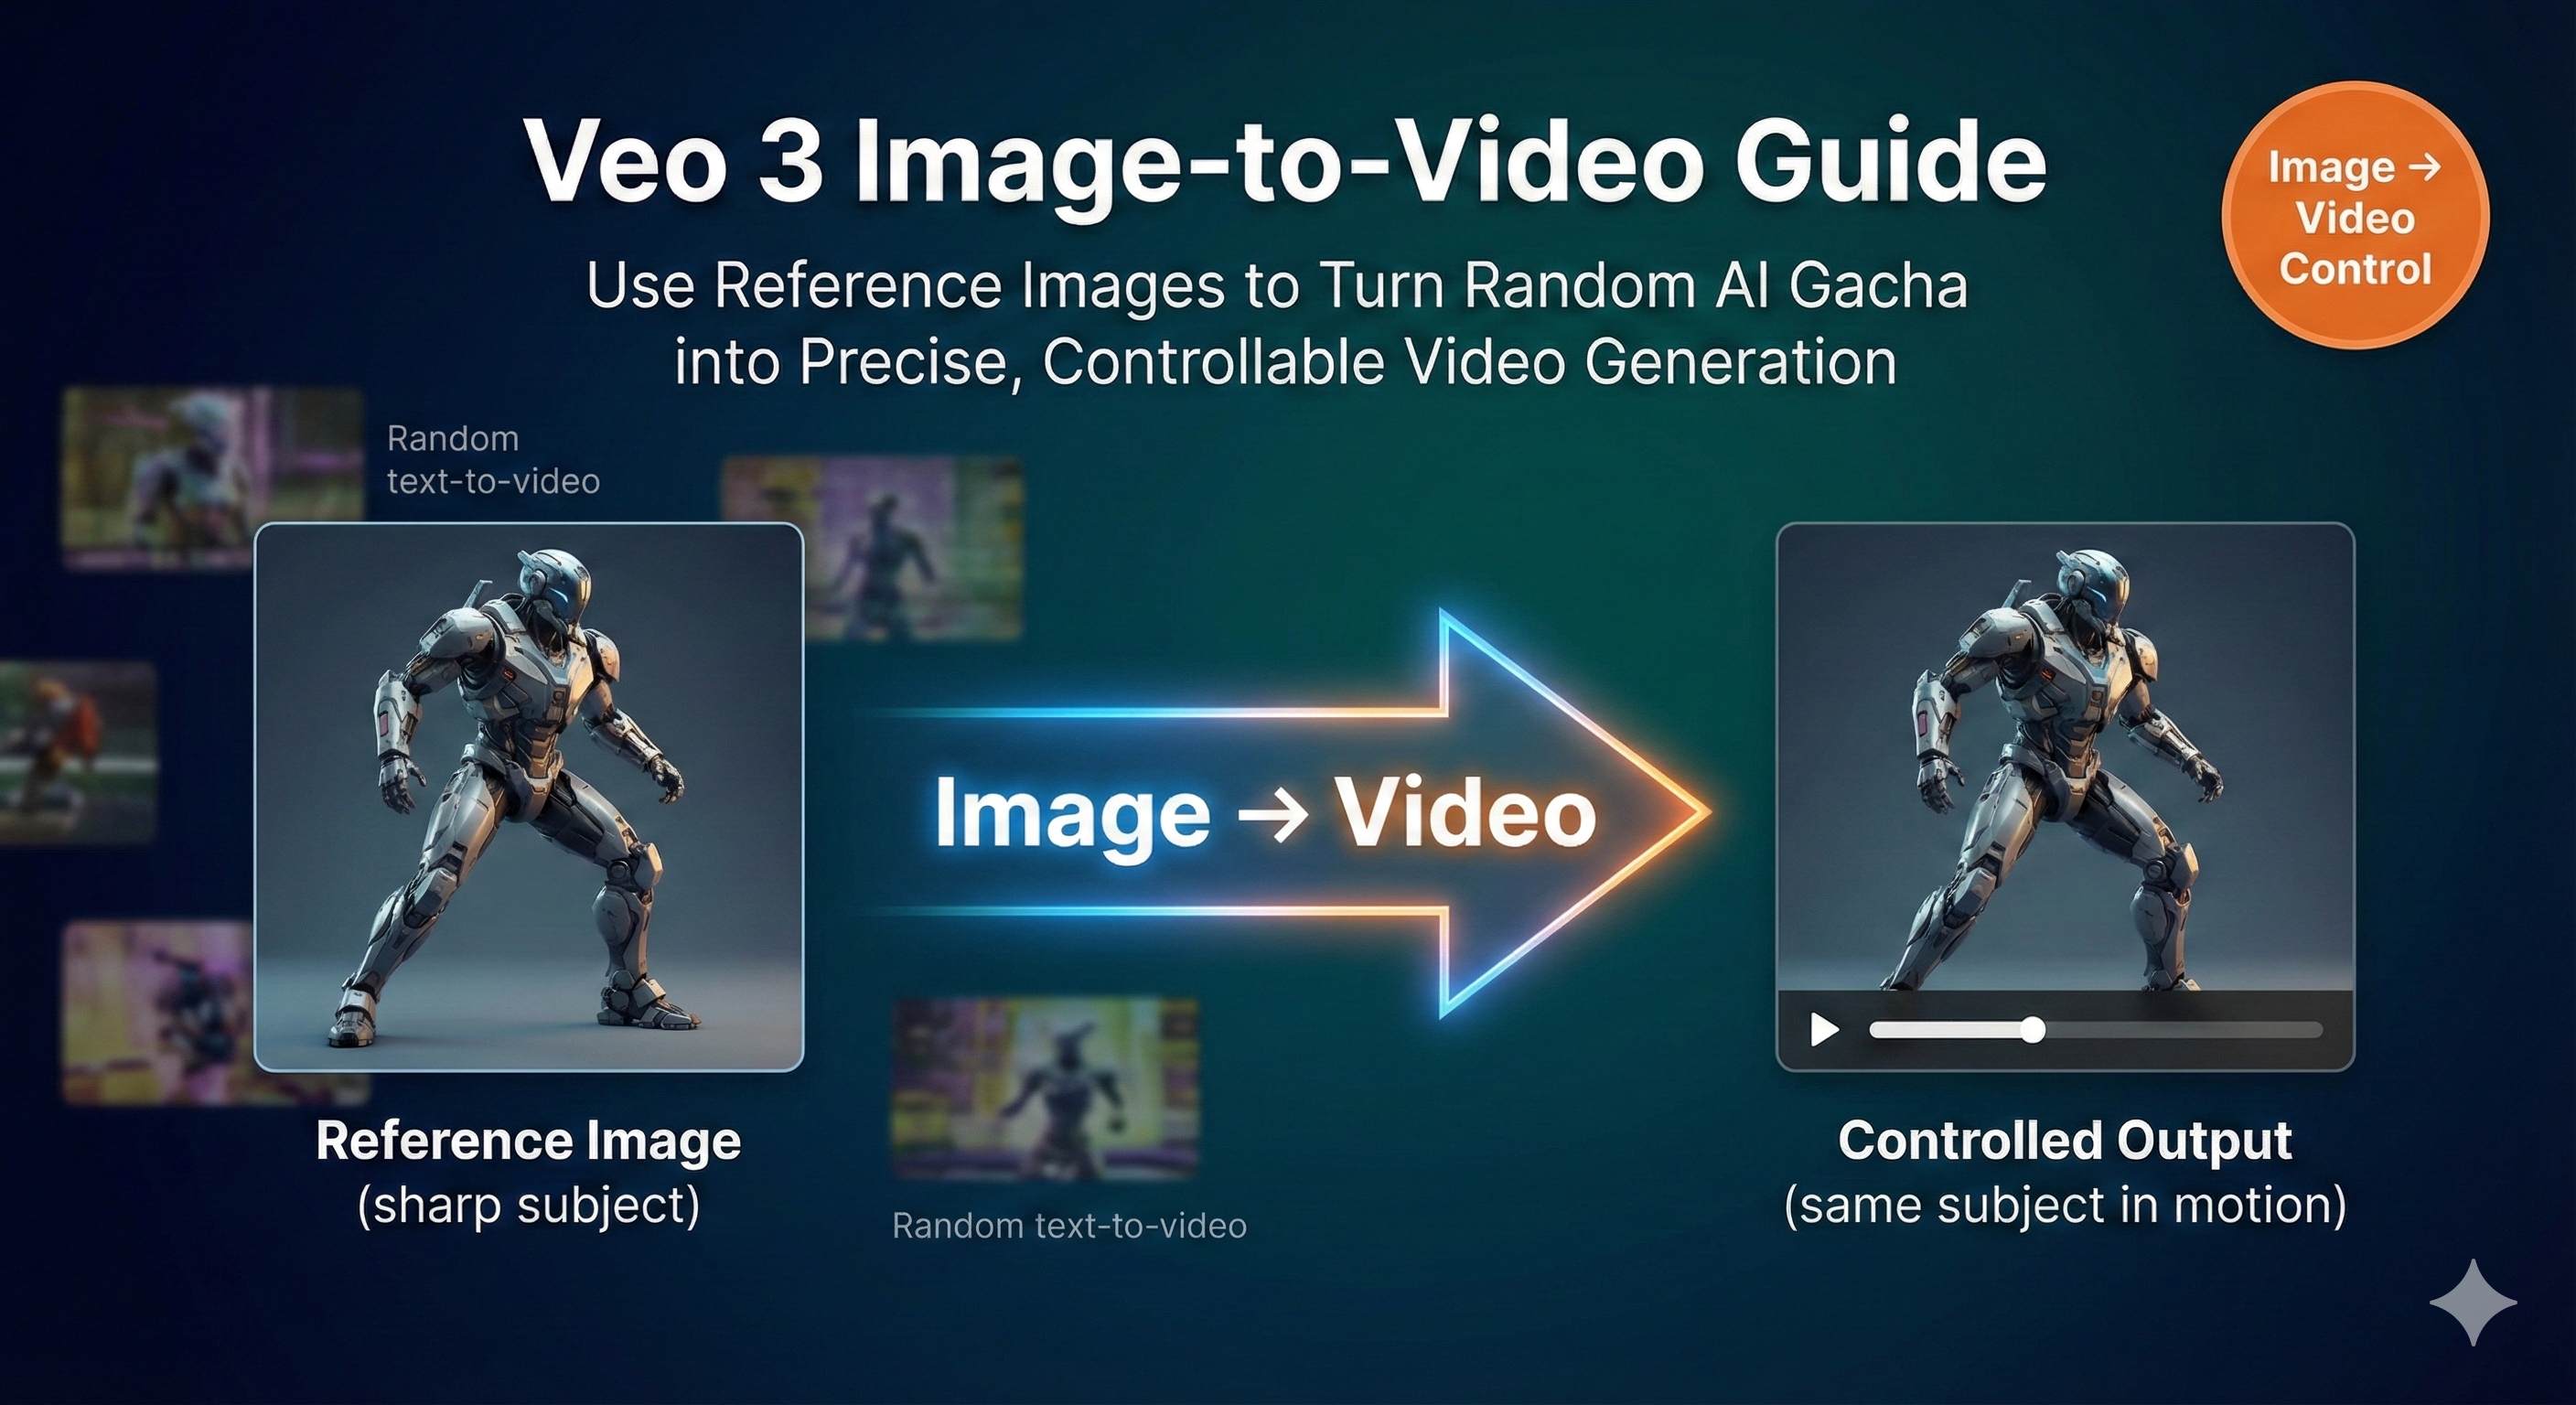
Tip 3: Image-to-Video Workflow (Most Reliable)
This is currently the most stable method I’ve found:
- First generate a perfect character static image using Imagen 3.
- Import that image as a reference in Veo 3’s Image-to-Video feature.
- Use this image as a visual baseline for all subsequent extensions.
This gives the AI a strong “reference answer” that’s harder to deviate from. Last time I used this method for a 90-second interview video, the host remained the same person throughout—even the hairstyle and clothing wrinkles stayed consistent.
Tip 4: Prompt Consistency Principle
Use exactly identical character description text. I know it sounds mechanical, but it really works. The more unique and specific your description, the better the consistency.
Good Description:
“A 28-year-old woman with shoulder-length curly red hair, wearing round tortoiseshell glasses and a navy blue cardigan over a white turtleneck.”
Poor Description:
“A young woman with nice hair and glasses.”
The second description is too vague—AI might interpret it differently each time.
Tip 5: Jump To and Extend Scene Features
These features leverage visual and text context from previous segments, but even when using them, you still need to include complete character descriptions in new prompts. Don’t be lazy—copy-pasting takes less than 10 seconds.
Tip 6: Multimodal Advanced Workflow (Advanced)
If you’re a tech enthusiast, try this advanced approach:
- Use Gemini 2.5 Pro to analyze character semantic features.
- Use Imagen 3.0 to synthesize reference images.
- Use Veo to generate video.
- Establish an “identity vector” to reduce drift.
This method is more complex, but the results are genuinely impressive. I’ve seen people use this workflow to create 3-minute shorts where the protagonist’s mole placement stays consistent throughout.
Real-World Cases and Common Issues
Case 1: Product Demo Video (45 seconds)
Scenario: Showcase three core features of an app.
Solution: Generate three 15-second segments using the same hand model and interface style.
Key Points:
- Maintain identical hand gestures, lighting, and shooting angles.
- Use the same phone model and desktop background.
- Explicitly specify in prompts “same hands, same phone, same desk.”
I used this method last week for a client demo video. The final stitched result had zero awkwardness—the client thought it was live-action footage.
Case 2: Interview Video (1 minute 30 seconds)
Scenario: TV anchor introducing three news topics.
Solution: Use Gemini API to extend to 90 seconds, combined with Scene Builder.
Key Points:
- Fixed camera position (anchor always centered in frame).
- Consistent background (news studio, screens and lighting in the back).
- Unchanged wardrobe (dark suit, tie).
The challenge in this case was the facial close-ups, which require extremely high consistency. I used the Image-to-Video workflow, first generating a front-facing photo of the anchor with Imagen, then referencing that photo for all segments.
Common Questions Q&A
Q: Why does my character look different every time?
A: 90% of the time it’s because your prompt isn’t detailed enough, or you keep “refining” the description with each generation. Remember, copy-paste is your friend—don’t try to “optimize” your prompts.
Q: Why does the Extend button switch to Veo 2?
A: Currently, Extend only supports Veo 2 Fast—that’s Google’s strategic limitation. If you want to maintain Veo 3 quality, you must use the Frames-to-Video workflow.
Q: Can videos downloaded from Flow be used commercially?
A: You need to review Google Veo’s terms of use. Currently, Veo 3 is still in experimental stages, so commercial use may have restrictions. Confirm before publishing.
Q: How do I choose a stitching tool?
A: Quick output → CapCut (free, easy to learn). Refined production → Premiere Pro (professional, comprehensive). Limited budget but need pro features → DaVinci Resolve (free version is already powerful).
Summary and Action Steps
Let’s recap the three core methods:
- Flow Scene Builder + Frames-to-Video: For pursuing Veo 3 high quality and audio, requires patience.
- Gemini API Automatic Extension: For batch generation and long videos (up to 148 seconds), requires programming skills.
- External Editing Tool Stitching: For refined post-production and multi-scene integration.
Character consistency is key to long-form video production. Of the 6 techniques, the most important are: create a Character Bible, use Image-to-Video workflow, and keep prompts completely identical.
Open Google Flow now and try the Scene Builder workflow. Start with one 8-second segment, then gradually extend to your target length using Frames-to-Video. You might hit some bumps the first time, but after a few attempts, you’ll get the hang of it.
Bookmark this article and refer to the 6 techniques next time you encounter character inconsistency issues. Who knows—maybe one day you’ll create a 3-minute AI short film that makes your friends think you hired a professional team.
Happy creating!
Published on: Dec 7, 2025 · Modified on: Dec 15, 2025
Related Posts
Complete Guide to Veo 3 Audio Generation: How to Add AI Voice and Music to Videos (With Prompt Templates)
The Complete Guide to Veo 3 Character Consistency: Creating Coherent Multi-Shot Videos with Scenebuilder
Comments
Sign in with GitHub to leave a comment