Docker Multi-Stage Builds: Shrinking Go/Java/Rust Images from GB to MB
A 650MB Image That Made Me Think
Last Friday afternoon, I was staring at a Pod in my K8s dashboard that had been pulling an image for five minutes. A simple Spring Boot app, packaged into a 650MB Docker image. A new intern on the team asked me, “Why is this image so huge?” I froze for a second, suddenly realizing I’d never really thought about it myself.
That night, I spent hours researching. The next morning, the same app, but the image was only 89MB. Deployment time dropped from 5 minutes to under 1 minute. The intern looked at me differently after that.
Turns out, it was just a few lines changed in the Dockerfile. This technique is called “multi-stage builds.”
To be honest, I initially thought this stuff wasn’t that useful. Our team’s Go project images were 295MB, Java projects routinely exceeded 500MB—it felt normal. Until one day I saw someone compress a Rust image from 2GB to 11MB—yes, from GB to MB—that’s when I realized I’d been building images wrong all along.
The core issue is this: compiled languages need compilers and build tools to turn source code into executables, but at runtime, you don’t need any of that stuff. Traditional Dockerfiles pack in Maven, Gradle, Go compilers—everything—like moving into a new place and bringing along all your construction tools, cement, and drills. Completely unnecessary.
Today I’ll show you how to slim down images using multi-stage builds with three real-world examples: Go, Java, and Rust. You’ll see:
- Go app from 295MB to 6.47MB (98% reduction)
- Java Spring Boot from 650MB to 89MB (86% reduction)
- Rust app from 2GB to 11.2MB (99.4% reduction)
If you’re only interested in a specific language, feel free to jump to that section. Each example is complete and you can copy the code to run directly.
Why Is Your Image So Bloated?
Let me show you a comparison table first—this is real data from my tests:
| Language | Traditional Single-Stage | Multi-Stage Build | Reduction |
|---|---|---|---|
| Go App | 295 MB | 6.47 MB | 98% |
| Java Spring Boot | 650 MB | 89 MB | 86% |
| Rust App | 2.1 GB | 11.2 MB | 99.4% |
The first time I saw this table, I was completely stunned. Especially that Rust data—2GB to 11MB, that’s not optimization, that’s magic.
Later, when I carefully analyzed the image composition, I understood where the problem was. Compiled languages have a characteristic: they need compilers to turn source code into binary executables. Writing Go requires the golang compiler, writing Java needs Maven or Gradle, writing Rust needs Cargo. These tools aren’t small:
- Go compiler: ~300MB
- Maven + OpenJDK: ~500MB
- Rust toolchain: ~1.5GB
A traditional Dockerfile looks like this:
FROM golang:1.21
WORKDIR /app
COPY . .
RUN go build -o myapp
CMD ["./myapp"]
Looks fine, right? Actually, there’s a big problem. This Dockerfile uses the entire golang:1.21 image (295MB) as the base, which includes the Go compiler, various build tools, and debugging tools. After your app compiles, none of this stuff gets removed—it all gets packed into the final image.
It’s like buying an empty apartment, hiring a construction crew to renovate it. When the renovation is done, you lock all the cement, drills, cutting machines, and workers’ toolboxes inside the room, then move in. Sounds absurd, but that’s exactly what many Dockerfiles do.
What you actually need at runtime is just the compiled binary file. A Go binary typically ranges from a few MB to a few dozen MB. Java jar files might be slightly larger, but still just dozens of MB. Rust compiled binaries are also small. The remaining hundreds of MB are all overhead from build tools and base images.
This bloat isn’t just wasting storage space. The real pain points are:
- Slow image pulls: In CI/CD pipelines, every deployment requires pulling the image. A 650MB image can test your patience when the network is slow
- Security risks: Production images containing compilers, source code, and build tools essentially leave attackers a toolkit
- Wasted build cache: Changing one line of code requires rebuilding the entire image because the compiler and code are coupled together
I remember once deploying on Alibaba Cloud, five team members simultaneously deployed new versions, each image 500MB+, which maxed out our internal network bandwidth. After that incident, I was determined to research image optimization.
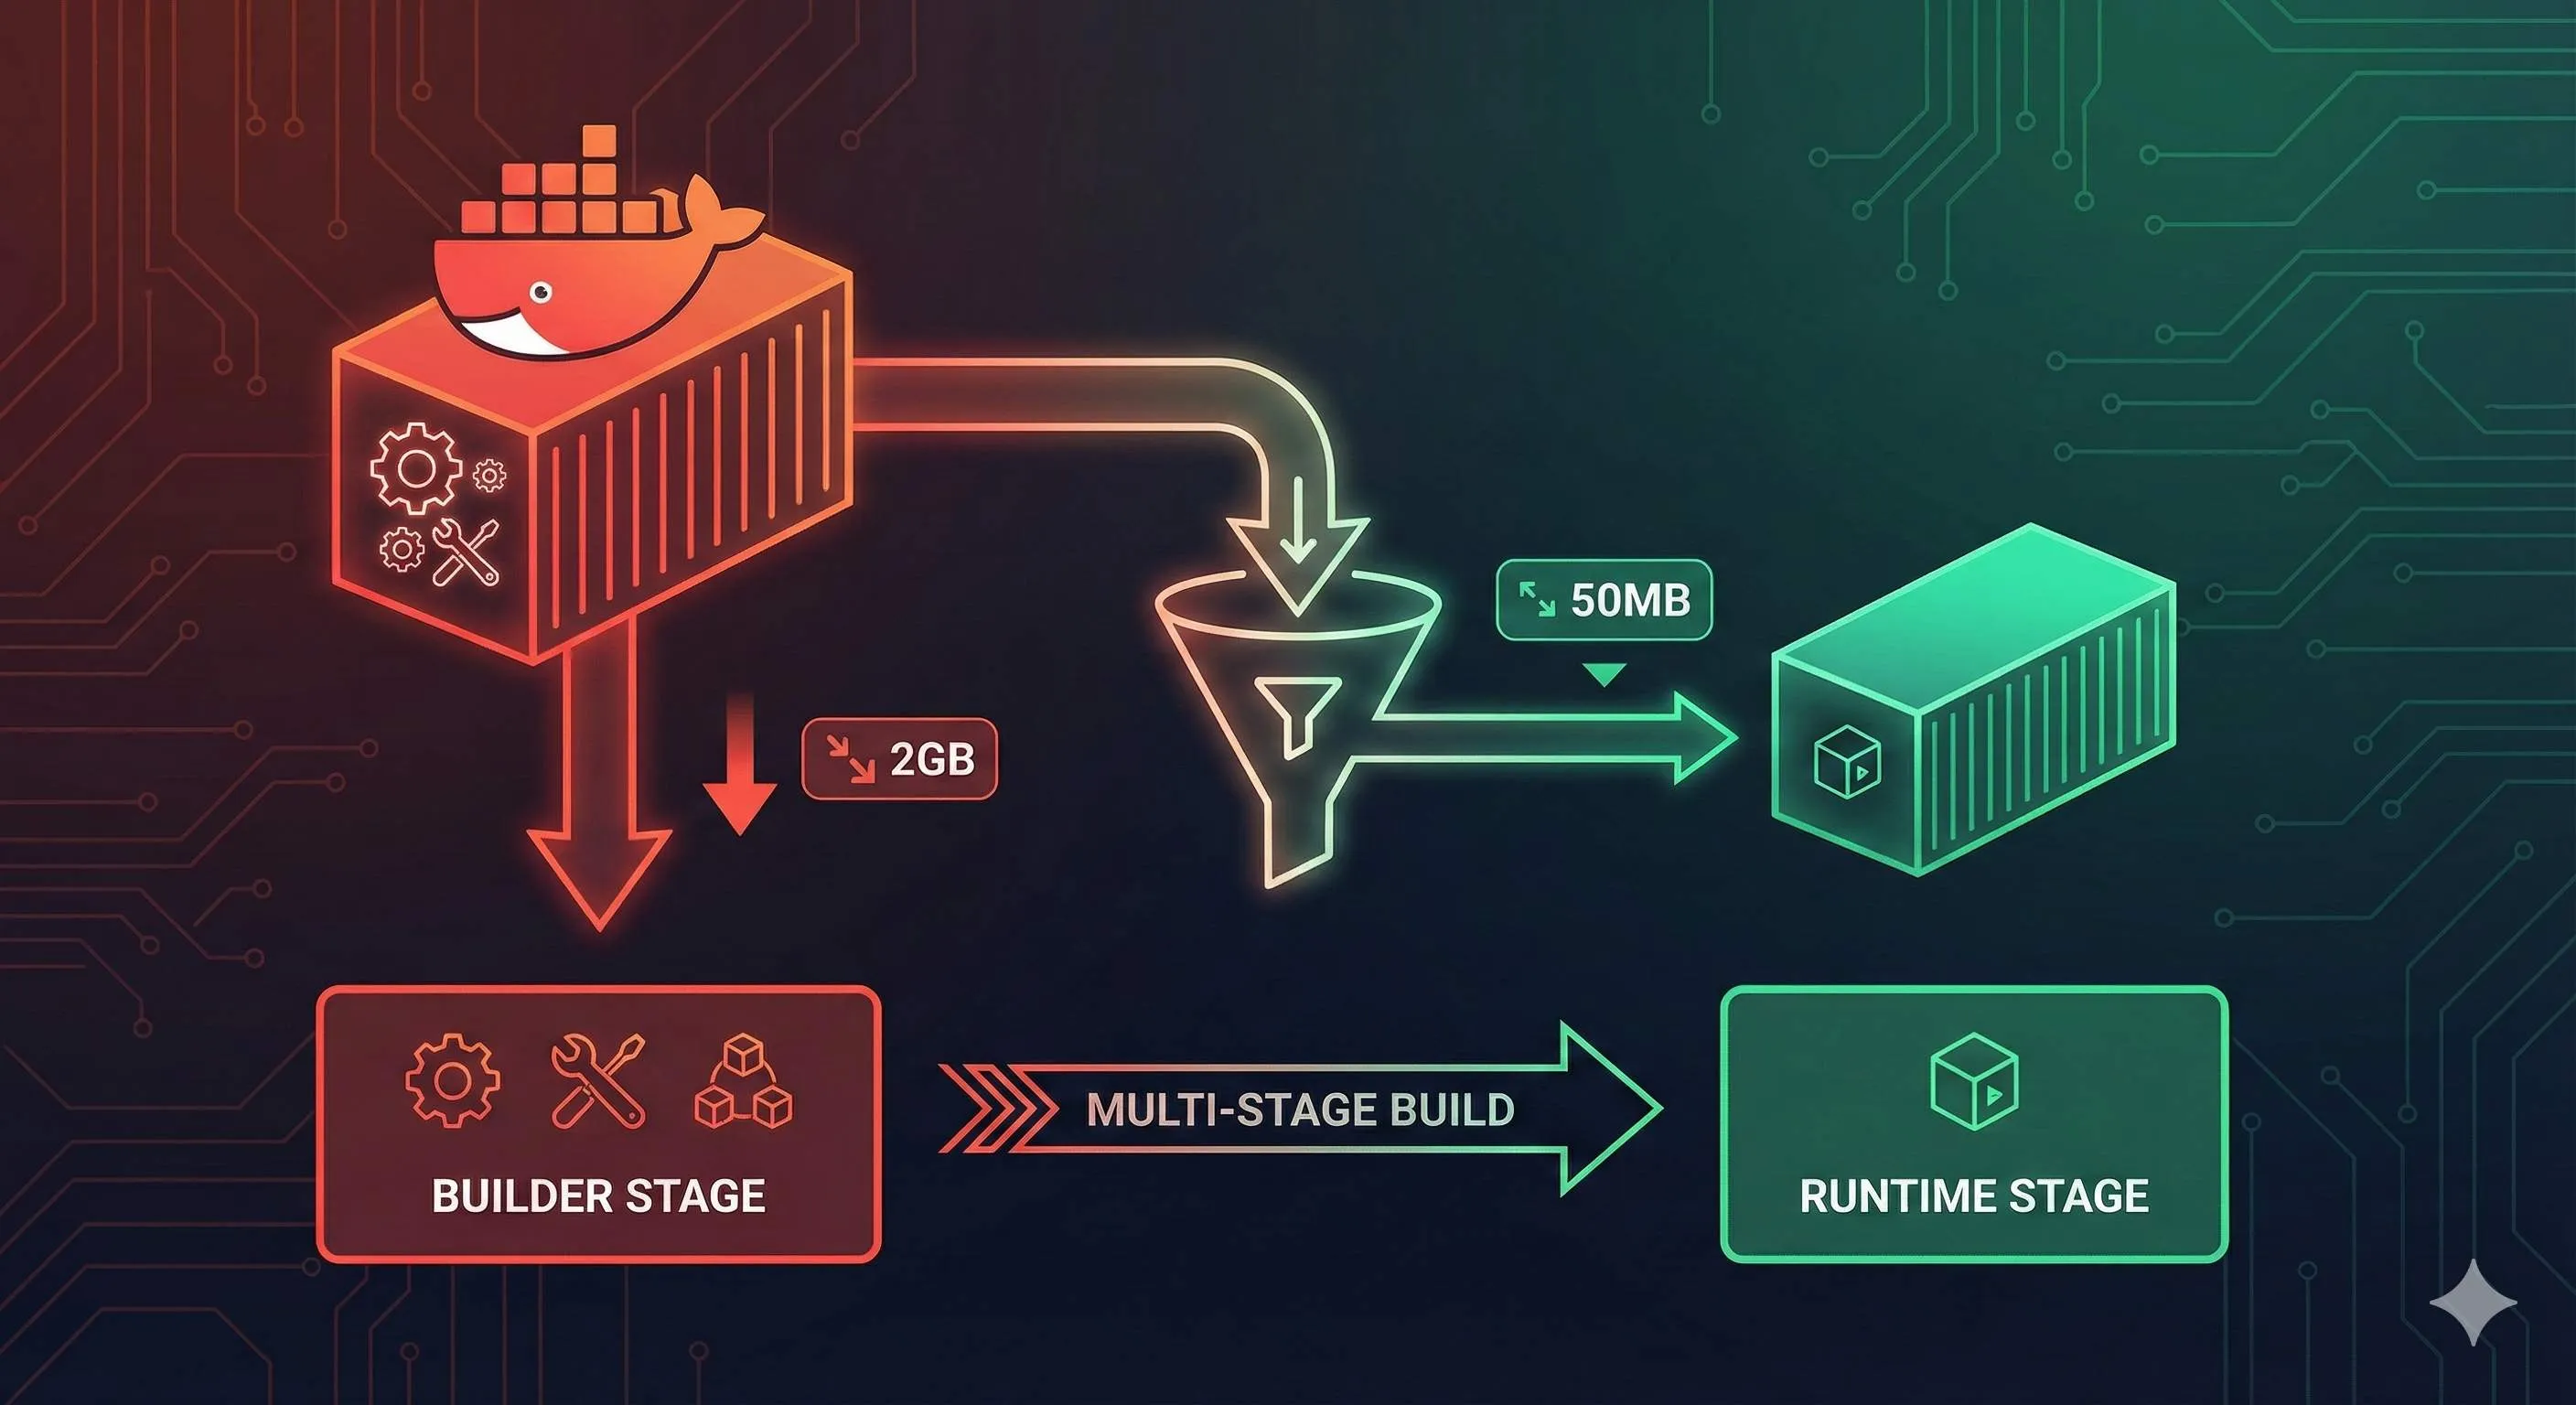
Multi-Stage Builds: One Dockerfile, Two Environments
Multi-stage builds are a feature introduced in Docker 17.05. The core concept is simple: define multiple stages in one Dockerfile, with earlier stages handling compilation and later stages handling runtime, passing only necessary artifacts in between.
In plain English: the construction crew renovates the house in the first stage, and when done, you only move the renovated house to the second stage, leaving all the cement and drills behind in the first stage.
Here’s the simplest example:
# First stage: build stage
FROM golang:1.21 AS builder
WORKDIR /app
COPY . .
RUN go build -o myapp

# Second stage: runtime stage
FROM alpine:3.18
WORKDIR /app
COPY --from=builder /app/myapp .
CMD ["./myapp"]
See the key points?
- First FROM has
AS builderadded, naming this stage “builder” - Second FROM starts a new stage, using the lightweight alpine image
- COPY —from=builder copies the compiled binary from the builder stage, throwing away everything else
The first stage golang:1.21 image is 295MB, but the final image is only the size of alpine (5MB) plus your binary (maybe a few MB), totaling just a dozen MB.
The first time I understood this principle, I had a lightbulb moment—it’s “only the result, not the process.” The compiler, source code, intermediate files are all process; the final binary is the result. Docker automatically discards the first stage image, keeping only the second stage.
You might ask: what if I need to debug the first stage? Docker provides a super useful command:
docker build --target builder -t myapp:debug .--target builder tells Docker to only build up to the builder stage, not executing the second stage. This way you can enter the first stage container to debug.
This design is really elegant. You can have three, four, or even more stages:
FROM node:18 AS frontend-builder
# Frontend build

FROM golang:1.21 AS backend-builder
# Backend build

FROM nginx:alpine
# Copy both frontend and backend artifacts
COPY --from=frontend-builder /app/dist /usr/share/nginx/html
COPY --from=backend-builder /app/api /usr/local/bin/api
Each stage independently completes its task, finally aggregating into the runtime stage. This organization makes Dockerfile logic particularly clear.
To be honest, when I write Dockerfiles now, for any compiled language, I default to using multi-stage builds. It’s become a habit.
Go Application’s Ultimate Slim-Down
Go is my favorite language for image optimization. Why? Go compiles binaries that are statically linked, not dependent on any system libraries, and can run directly in a blank image.
First, the traditional approach (don’t follow this):
FROM golang:1.21
WORKDIR /app
COPY . .
RUN go build -o myapp
CMD ["./myapp"]
Build it:
docker build -t myapp:old .
docker images myapp:old
# REPOSITORY   TAG    IMAGE ID       SIZE
# myapp        old    abc123def456   295MB
295MB. A simple HTTP service requires this much.
Now for the multi-stage optimized version:
# Build stage
FROM golang:1.21-alpine AS builder
WORKDIR /app

# Copy dependency files and download dependencies (leverage cache)
COPY go.mod go.sum ./
RUN go mod download

# Copy source code and compile
COPY . .
RUN CGO_ENABLED=0 GOOS=linux go build -ldflags="-w -s" -o myapp .

# Runtime stage
FROM scratch
WORKDIR /app
COPY --from=builder /app/myapp .
EXPOSE 8080
CMD ["./myapp"]
Build again:
docker build -t myapp:new .
docker images myapp:new
# REPOSITORY   TAG    IMAGE ID       SIZE
# myapp        new    def456ghi789   6.47MB
6.47MB! From 295MB to 6.47MB, a 98% reduction.
This Dockerfile has several key points:
1. CGO_ENABLED=0
This environment variable tells the Go compiler to disable CGO, generating a purely statically linked binary. If your code uses C libraries (like SQLite), this won’t work—you’ll need a different base image.
2. -ldflags=“-w -s”
These are compiler optimization parameters:
-w: remove debugging information-s: remove symbol table
This can make the binary 20-30% smaller. Production environments basically don’t need this information, so it’s safe to remove.
3. FROM scratch
scratch is Docker’s blank image, containing nothing, 0 bytes in size. Go’s static binaries can run directly in scratch without needing any system libraries.
4. Dependency cache trick
Notice I first copy go.mod and go.sum, then execute go mod download. The benefit of doing this: as long as these two files don’t change, Docker will use the cached dependency layer, not needing to re-download. Changing business code won’t trigger dependency re-downloading, making builds much faster.
I’ve tested this—with this trick, the time to rebuild after changing code dropped from 2 minutes to 15 seconds.
Advanced: Handling Time Zones and CA Certificates
The scratch image is too clean—it doesn’t even have timezone data or CA certificates. If your app needs to make HTTPS requests or handle timezones, it will error. The solution is to copy these files from the builder stage:
FROM scratch
WORKDIR /app
# Copy timezone data
COPY --from=builder /usr/share/zoneinfo /usr/share/zoneinfo
# Copy CA certificates
COPY --from=builder /etc/ssl/certs/ca-certificates.crt /etc/ssl/certs/
COPY --from=builder /app/myapp .
ENV TZ=Asia/Shanghai
CMD ["./myapp"]
Or just use gcr.io/distroless/static-debian11 instead of scratch—this image is only 2MB but includes timezone data and CA certificates:
FROM gcr.io/distroless/static-debian11
COPY --from=builder /app/myapp /app/myapp
CMD ["/app/myapp"]
I generally use distroless now—much more convenient.
Java/Spring Boot’s Elegant Slim-Down
Java image optimization is a bit more complex than Go. Java needs a JRE runtime environment, can’t use scratch like Go. But with the right approach, you can still compress the size significantly.
Traditional approach (many Java projects do this):
FROM maven:3.8-openjdk-17
WORKDIR /app
COPY . .
RUN mvn clean package -DskipTests
CMD ["java", "-jar", "target/myapp.jar"]
The built image is 650MB. The Maven image itself is 500MB, plus your jar and various caches—losing control of size is normal.
Multi-stage optimized version:
# Build stage
FROM maven:3.8-openjdk-17-slim AS builder
WORKDIR /app

# First copy pom.xml, download dependencies (leverage cache)
COPY pom.xml .
RUN mvn dependency:go-offline -B

# Copy source code and package
COPY src ./src
RUN mvn package -DskipTests

# Runtime stage
FROM openjdk:17-jre-slim
WORKDIR /app

# Only copy the jar
COPY --from=builder /app/target/*.jar app.jar

# JVM parameter tuning
ENV JAVA_OPTS="-Xms128m -Xmx512m -XX:+UseContainerSupport"

EXPOSE 8080
CMD java $JAVA_OPTS -jar app.jar
After building:
docker images myapp:new
# REPOSITORY   TAG    IMAGE ID       SIZE
# myapp        new    xyz789abc012   89MB
From 650MB to 89MB, an 86% reduction.
Key points explained:
1. JDK vs JRE
Build stage uses openjdk-17 (includes compiler), runtime stage uses openjdk-17-jre-slim (runtime only). JRE is more than half smaller than JDK:
- OpenJDK 17: ~500MB
- OpenJDK 17 JRE: ~200MB
- OpenJDK 17 JRE Slim: ~80MB
2. Maven dependency cache
First copy pom.xml, execute mvn dependency:go-offline to download all dependencies. As long as pom.xml doesn’t change, this layer gets cached. Changing business code won’t trigger re-downloading dependencies.
This trick is crucial. Before I used it, changing one line of code and rebuilding would re-download dependencies, Maven repo is overseas, often got stuck for dozens of minutes. Now it only takes seconds.
3. JVM parameter tuning
-XX:+UseContainerSupport makes the JVM aware of container memory limits. Without this parameter, JVM allocates heap size based on the host machine’s memory, easily causing container OOM.
-Xms128m -Xmx512m sets heap memory range. Adjust according to your app’s actual needs, don’t blindly set 1G.
Gradle version
If you use Gradle, modify slightly:
FROM gradle:8.5-jdk17 AS builder
WORKDIR /app

# Copy Gradle configuration files
COPY build.gradle settings.gradle ./
COPY gradle ./gradle

# Download dependencies
RUN gradle dependencies --no-daemon

# Copy source code and build
COPY src ./src
RUN gradle bootJar --no-daemon

FROM openjdk:17-jre-slim
WORKDIR /app
COPY --from=builder /app/build/libs/*.jar app.jar
ENV JAVA_OPTS="-Xms128m -Xmx512m -XX:+UseContainerSupport"
CMD java $JAVA_OPTS -jar app.jar
A pitfall: Spring Boot layered builds
Spring Boot 2.3+ supports jar layering, which can separate dependencies and business code for further cache optimization. This is slightly more advanced, code looks like this:
FROM maven:3.8-openjdk-17-slim AS builder
WORKDIR /app
COPY pom.xml .
RUN mvn dependency:go-offline -B
COPY src ./src
RUN mvn package -DskipTests
RUN java -Djarmode=layertools -jar target/*.jar extract

FROM openjdk:17-jre-slim
WORKDIR /app
# Copy in layer order, dependency layer changes least frequently
COPY --from=builder /app/dependencies/ ./
COPY --from=builder /app/spring-boot-loader/ ./
COPY --from=builder /app/snapshot-dependencies/ ./
COPY --from=builder /app/application/ ./
CMD ["java", "org.springframework.boot.loader.JarLauncher"]
This way even if you change business code, the dependency layer won’t invalidate, builds are faster. But honestly, I usually don’t use this approach—maintenance cost is slightly higher, the simple version above is sufficient.
Rust Application’s Minimal Deployment
Rust’s image optimization effect is the most dramatic. The Rust toolchain is huge (1.5GB+), but compiled binaries are tiny. The first time I saw the optimization results I was shocked—2.1GB to 11.2MB, that’s insane.
Traditional approach:
FROM rust:1.75
WORKDIR /app
COPY . .
RUN cargo build --release
CMD ["./target/release/myapp"]
Built image is 2.1GB. The Rust toolchain is too large—rustc compiler, cargo, various dependencies, all packed in.
Multi-stage optimized version:
# Build stage
FROM rust:1.75 AS builder
WORKDIR /app

# Copy dependency files, compile dependencies first (leverage cache)
COPY Cargo.toml Cargo.lock ./
RUN mkdir src && echo "fn main() {}" > src/main.rs
RUN cargo build --release
RUN rm -rf src

# Copy real code, compile application
COPY src ./src
RUN touch src/main.rs  # Update timestamp, trigger recompilation
RUN cargo build --release

# Runtime stage
FROM gcr.io/distroless/cc-debian11
WORKDIR /app
COPY --from=builder /app/target/release/myapp .
CMD ["./myapp"]
After building:
docker images myapp:new
# REPOSITORY   TAG    IMAGE ID       SIZE
# myapp        new    rst345uvw678   11.2MB
11.2MB! A 99.4% reduction.
Rust-specific cache optimization
Rust dependency compilation is particularly slow, often taking dozens of minutes. The core of the above trick: first create a fake main.rs, let cargo compile dependencies, then delete the fake file, copy real code and compile again.
This way, as long as Cargo.toml and Cargo.lock don’t change, the dependency layer gets cached. Changing business code only requires recompiling your code, not recompiling dependencies.
I’ve tested this—for a medium-sized project, with this trick, the time to rebuild after code changes dropped from 15 minutes to 2 minutes.
Static linking vs dynamic linking
Rust’s default compiled binary might depend on glibc. If your code is pure Rust without C libraries, you can compile with musl to get a fully statically linked binary, then use scratch:
FROM rust:1.75 AS builder
WORKDIR /app

# Install musl toolchain
RUN rustup target add x86_64-unknown-linux-musl

COPY Cargo.toml Cargo.lock ./
RUN mkdir src && echo "fn main() {}" > src/main.rs
RUN cargo build --release --target x86_64-unknown-linux-musl
RUN rm -rf src

COPY src ./src
RUN touch src/main.rs
RUN cargo build --release --target x86_64-unknown-linux-musl

# Runtime stage
FROM scratch
COPY --from=builder /app/target/x86_64-unknown-linux-musl/release/myapp /myapp
CMD ["/myapp"]
This way the image size can be even smaller, possibly only 5-8MB.
But honestly, I generally just use gcr.io/distroless/cc—better compatibility, only a few MB larger, worth it.
A pitfall: Cargo cache location
Some articles will teach you to also cache the /usr/local/cargo directory. Don’t do this. This directory contains lots of compilation intermediates, making the cache layer extremely large, actually slower. I’ve stepped on this landmine—the cache layer was 800MB, every build took forever.
Advanced Techniques for Fast and Stable Builds
The previous sections covered basic multi-stage build usage. This section discusses techniques to make builds faster and more stable.
1. .dockerignore file
This is crucial but many people overlook it. .dockerignore works like .gitignore, telling Docker which files not to copy to the build context.
Before I used this, every build Docker had to package the entire project directory (including node_modules, .git, target, etc.) and send it to the Docker daemon. A project hundreds of MB, just sending the context took half a minute.
Now every project I create .dockerignore:
# Version control
.git
.gitignore

# Dependency directories
node_modules
target
dist
build

# IDE
.vscode
.idea
*.swp

# Tests and docs
**/*_test.go
**/*_test.rs
*.md
docs/

# Environment variables and secrets
.env
.env.local
*.key
*.pem
After adding this file, my build speed increased 3-5x. Especially in CI/CD pipelines, the effect is particularly noticeable.
2. Debugging multi-stage builds
I mentioned the --target parameter earlier, let me expand on it. Suppose your build fails at the builder stage, how do you debug?
# Only build to builder stage
docker build --target builder -t myapp:debug .

# Enter this image
docker run -it myapp:debug sh

# Manually execute build commands inside the container, see where it fails
This technique is particularly useful. Once my Go project build failed with a strange error. I used this method to enter the builder container, manually ran go build, and discovered it was Go version incompatible with dependencies.
3. Naming build stages
Give each stage a meaningful name, don’t use stage1, stage2. Compare:
# Bad
FROM golang:1.21 AS stage1
FROM node:18 AS stage2
FROM nginx AS stage3

# Good
FROM golang:1.21 AS backend-builder
FROM node:18 AS frontend-builder
FROM nginx AS runtime
When you come back to look at the code months later, you’ll thank yourself for taking naming seriously.
4. BuildKit parallel builds
Docker BuildKit is the next-generation build engine, supporting parallel builds and better caching mechanisms. Enable it:
export DOCKER_BUILDKIT=1
docker build .
Or temporarily enable when building:
DOCKER_BUILDKIT=1 docker build .BuildKit has several benefits:
- Multiple independent stages can build in parallel
- Smarter caching strategy
- Clearer build output
I now use BuildKit by default, and also configured DOCKER_BUILDKIT=1 in CI/CD.
5. Pin base image versions
Don’t use FROM golang:latest, that’s a trap. Production environments must pin versions:
# Bad - unpredictable behavior
FROM golang:latest

# Good - explicit version
FROM golang:1.21.5-alpine3.18

# Better - pin with SHA256
FROM golang@sha256:abc123...
I’ve been burned before—one deployment suddenly failed, spent ages troubleshooting only to find golang:latest updated, new version incompatible with our dependencies. Since then I always pin versions.
6. Properly use COPY caching
The order of COPY instructions is important. Put files that change infrequently first, frequently changing ones later:
# Good order
FROM golang:1.21-alpine AS builder
WORKDIR /app

# 1. First copy dependency files (rarely change)
COPY go.mod go.sum ./
RUN go mod download

# 2. Then copy source code (changes frequently)
COPY . .
RUN go build -o myapp

# Bad order
COPY . .  # Copy all files at once
RUN go mod download && go build -o myapp
The first approach, changing code won’t trigger dependency re-downloading. The second approach, changing any file requires re-downloading dependencies.
This technique has been repeatedly used in previous examples, but worth emphasizing again—this is the core principle of cache optimization.
Base Image Selection Guide
Choosing a base image can be confusing. Alpine, Slim, Distroless, Scratch—everyone recommends something different, which to choose? Based on practical experience, I’ve compiled a comparison table:
| Image Type | Size | Contents | Pros | Cons | Use Cases |
|---|---|---|---|---|---|
| scratch | 0 MB | Completely blank | Smallest size, minimal attack surface | No shell, no debugging tools, no CA certs | Go static compile, Rust static compile |
| distroless | 2-20 MB | Runtime libs, CA certs | No shell, high security, small size | Difficult to debug | Go, Java, Rust, Node.js |
| alpine | 5-40 MB | musl libc, package manager | Small size, has shell | musl libc compatibility issues, DNS issues | Apps with no glibc dependency |
| slim | 70-120 MB | Minimal Debian/Ubuntu | Complete glibc, good compatibility | Slightly larger | Apps with C library dependencies |
| Full image | 200MB+ | Complete system | Contains all tools | Large size, high security risk | Not recommended for production |
My selection strategy:
Go applications
- First choice:
gcr.io/distroless/static-debian11(includes CA certs) - Backup:
scratch(need to manually copy CA certs and timezone data) - If using CGO:
gcr.io/distroless/base-debian11oralpine
Java applications
- First choice:
openjdk:17-jre-slim(complete JRE, good compatibility) - Advanced:
gcr.io/distroless/java17-debian11(smaller and more secure, but hard to debug) - Avoid:
openjdk:17-alpine(JVM has bugs on Alpine)
Rust applications
- First choice:
gcr.io/distroless/cc-debian11(includes C runtime libs) - If purely static compile:
scratch - Avoid: Full
rustimage (unnecessary for production)
About Alpine pitfalls
Many articles recommend Alpine, but I’ve stepped on a few landmines:
- musl libc compatibility: Alpine uses musl libc, not glibc. Some programs (especially Java, Python) can have strange bugs on Alpine
- DNS resolution issues: Go programs on Alpine sometimes encounter DNS resolution timeouts, requiring special configuration
- Timezone issues: No timezone data by default, need to manually install
tzdatapackage
My recommendation: if you’re not particularly familiar with Alpine, using -slim images is safer. Size might be a few dozen MB larger, but fewer pitfalls.
About Distroless
Distroless is a minimal image series launched by Google, characterized by no shell, no package manager, only including runtime essentials.
Pros:
- Minimal attack surface, hackers can’t get in (how to execute commands without shell?)
- Small size
- Officially maintained, regularly updated security patches
Cons:
- Difficult to debug, can’t
docker exec -itto look around - Need to prepare all files in build stage
I now basically use Distroless in production. When debugging, use --target builder to enter the build stage container, production runs Distroless.
A decision tree
Don’t know which to choose? Follow this process:
What language is your application?
├─ Go
│  ├─ Pure Go code → distroless/static or scratch
│  └─ Uses CGO → distroless/base or alpine
├─ Java
│  ├─ Prioritize stability → openjdk:jre-slim
│  └─ Prioritize size → distroless/java
├─ Rust
│  ├─ Pure Rust → distroless/cc or scratch
│  └─ Uses C libs → distroless/cc
└─ Other
   └─ Try slim first, if issues then switch
This decision tree is summarized from actual projects, basically covers 90% of scenarios.
After All That, Three Core Points
The essence of multi-stage builds is actually very simple:
- Build stage: Use full image to compile code
- Runtime stage: Use minimal image to run app
- COPY —from: Only pass necessary artifacts
That’s it. But the results are truly dramatic—70-90% size reduction, 2-3x speed increase after build cache optimization, significantly improved security.
My current habit: for new projects, the first thing I do is write a multi-stage Dockerfile. Whether Go, Java, or Rust, I default to this pattern. It’s become muscle memory.
Here are some action suggestions:
What you can do today:
- Take an existing project, try multi-stage builds
- Use
docker imagesto see the size comparison before and after optimization - If results are good, immediately promote to other projects
Worth deeper learning:
- Check out Docker’s official documentation best practices
- Try the
divetool to analyze image layers (docker run --rm -it wagoodman/dive:latest your-image) - Research BuildKit’s advanced features
Long-term optimization directions:
- Configure image caching in CI/CD pipelines
- Regularly update base image versions, fix security vulnerabilities
- Use security scanning tools (like Trivy) to check images
Finally, some honest thoughts. Docker image optimization isn’t technically difficult—the challenge is awareness. Many teams’ images were set up years ago, nobody’s managed them, getting bigger and bigger. Until one day deployments are unbearably slow, then they think about optimization.
Don’t wait for that day. Try multi-stage builds today, you’ll discover images can be this small, builds can be this fast.
Let’s chat in the comments: how big are your project images? What were the results after optimization? Any pitfalls you’ve encountered? I’m quite interested.
FAQ
What is a Docker multi-stage build?
This excludes compilers, build tools, and source code from the final image, dramatically reducing size.
How much can multi-stage builds reduce image size?
• Go 98% reduction (295MB to 6.47MB)
• Java 86% (650MB to 89MB)
• Rust 99.4% (2GB to 11.2MB)
Typical reduction is 70-90% for compiled languages.
Do I need multi-stage builds for interpreted languages like Python or Node.js?
For Python/Node.js, multi-stage builds help exclude build dependencies and reduce layers.
Focus on compiled languages (Go, Java, Rust, C++) for maximum impact.
What base images should I use for runtime stage?
• distroless/static for Go
• distroless/java for Java
• distroless/cc for Rust
These contain only runtime libraries, no shell or package managers, maximizing security and minimizing size.
How do I copy files between stages?
Only copy what's needed for runtime.
Will multi-stage builds slow down my build process?
Docker caches each stage independently. If source code changes, only the build stage rebuilds.
The runtime stage uses cached layers, making subsequent builds faster.
Can I use multi-stage builds with Docker Compose?
The Dockerfile syntax is the same, just build normally and Compose will use the multi-stage Dockerfile.
15 min read · Published on: Dec 17, 2025 · Modified on: Apr 1, 2026
Related Posts
shadcn/ui Composition Patterns: Best Practices for Combining Components

shadcn/ui Composition Patterns: Best Practices for Combining Components
Astro + Tailwind: Configuring Island Components and Global Styles Without Conflicts

Astro + Tailwind: Configuring Island Components and Global Styles Without Conflicts
React Compiler + shadcn/ui: Frontend Development in the Auto-Optimization Era

Comments
Sign in with GitHub to leave a comment