
ComfyUI ControlNet: Control Poses and Composition with OpenPose, Canny, and Depth
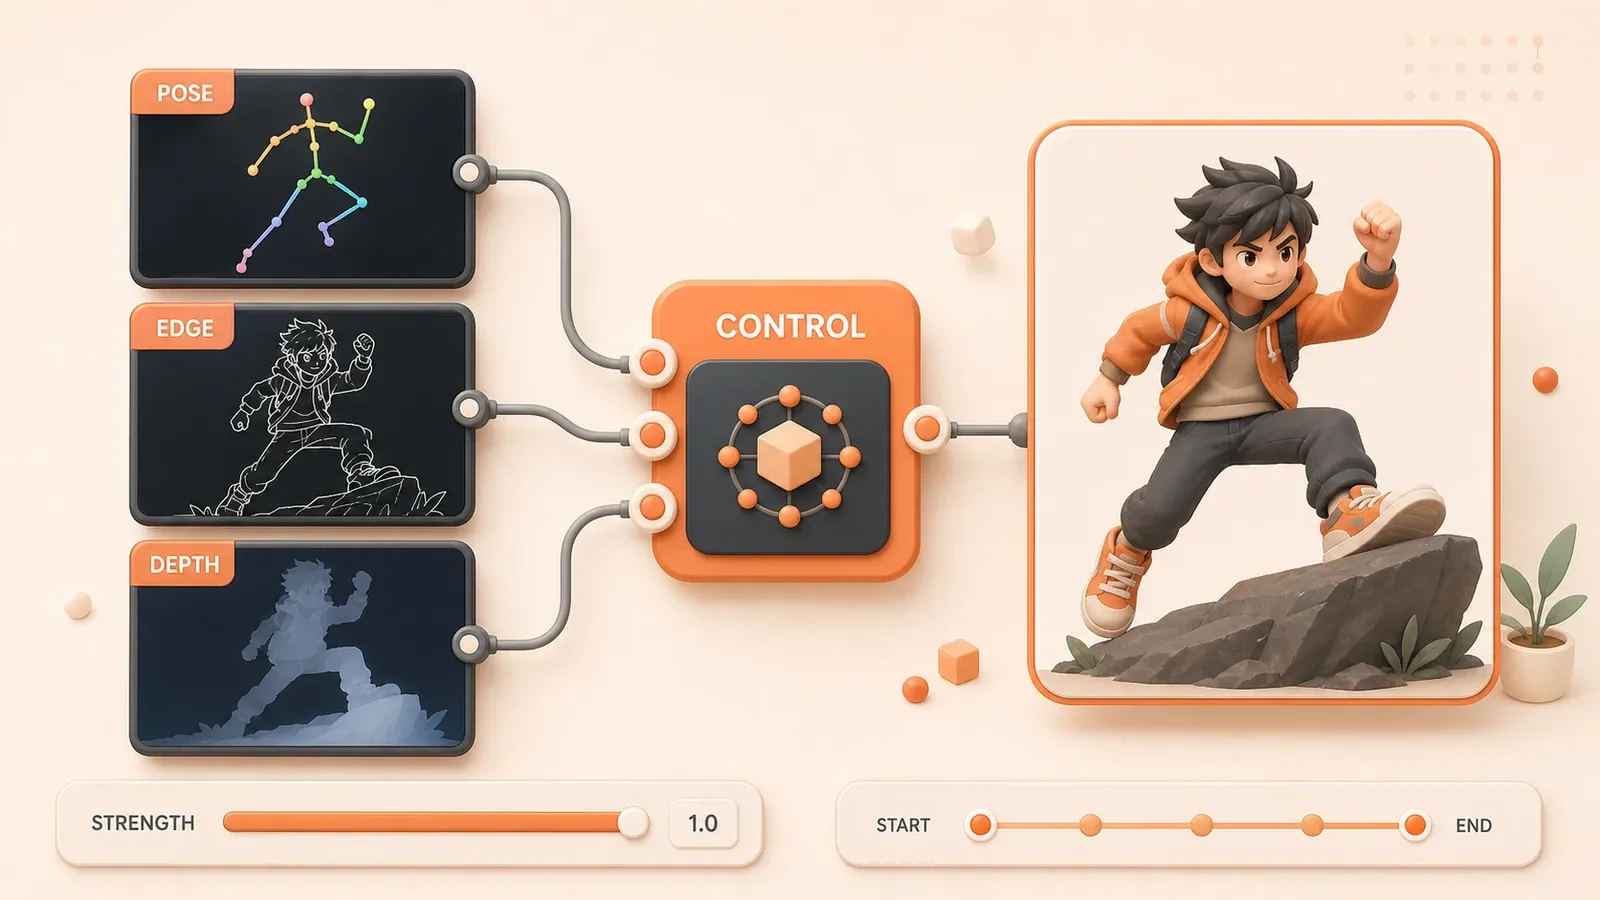
"The official ComfyUI Apply ControlNet documentation describes the node inputs, strength range, and start_percent/end_percent behavior."
You have a reference image and want the AI to follow it: the pose should stay close, the line work should remain accurate, and the composition should not drift. Instead, the generated pose bends, the edges blur, and the layout changes.
ControlNet handles this kind of structural guidance. OpenPose constrains pose, Canny extracts edges, and Depth preserves spatial relationships. The harder questions come next: what should strength be, what do start_percent and end_percent mean, and how do you combine controls without making them fight?
Choose the preprocessor and weights from the control target first. Then tune strength and the active range. If the output still misses the reference, inspect the node connections, base-model compatibility, and competing control signals in that order.
Quick Reference: Which ControlNet Fits the Target?
The first decision is not the strength value. It is the kind of structure you need to preserve.
| Goal | Control type | Preprocessor | Common SD1.5 weights |
|---|---|---|---|
| Generate a person in a specified pose | Pose control | OpenPose / DWPose | control_v11p_sd15_openpose |
| Follow the line work of a reference | Edge control | Canny | control_v11p_sd15_canny |
| Preserve spatial layers and composition | Depth control | Depth (MiDaS / LeReS) | control_v11f1p_sd15_depth |
| Use a hand-drawn sketch as guidance | Sketch control | Scribble | control_v11p_sd15_scribble |
| Preserve softer contours | Soft-edge control | SoftEdge (HED / PiDiNet) | control_v11p_sd15_softedge |
Two details matter when you choose a preprocessor:
-
OpenPose and DWPose both produce pose keypoints. DWPose often provides fuller body, hand, and facial keypoints, so it is worth trying when gestures or facial structure matter.
-
The preprocessor output must match what the ControlNet weights expect. An OpenPose map needs pose-compatible weights. A mismatched control map, model, or base architecture may produce almost no change or fail outright.
ControlNet files normally go in ComfyUI/models/controlnet. Restart ComfyUI or refresh the model list, then select the file in Load ControlNet Model.
ControlNet Parameter Reference
After the model loads, strength, start_percent, and end_percent determine how strongly and when the control applies. Use the official ranges as limits and the starting values below as a reproducible baseline.

| Parameter | Range | Starting value | What it changes | How to test it |
|---|---|---|---|---|
strength | 0–10 | 1.0 | The influence of the control map | Keep the seed fixed and move slightly above or below 1.0; the official docs suggest testing commonly within 0.5–1.5 |
start_percent | 0–1 | 0 | When ControlNet begins affecting diffusion | Pose and composition usually start at 0; delay it only after a baseline works |
end_percent | 0–1 | 1 | When ControlNet stops affecting diffusion | If the output is too rigid, try 0.8 or lower so late details can vary |
An Intuitive Model for start_percent and end_percent
These values define an active interval, not a waiting time. With start_percent=0.2 and end_percent=0.8, ControlNet affects only the 20%–80% portion of diffusion. It does not constrain the first or final fifth.
Large structures such as pose and composition form early. If you need a stable pose, start with the control active from 0. If the output looks overconstrained, keep start_percent=0 and move end_percent from 1 to 0.8 so the final phase can refine details without constant pressure from the control map.
The full interval (start_percent=0, end_percent=1) is a useful baseline. Confirm the workflow has an effect before changing one parameter at a time.
Choosing a ControlNet Strength
strength controls the influence of the ControlNet. A value of 0 disables that control. Higher values generally enforce the map more strongly, but different base models and ControlNet implementations respond differently.
Start around 1.0. Increase it in small steps when the output ignores the map; lower it when anatomy, lines, or details become stiff or distorted. ComfyUI’s official node documentation calls 0.5–1.5 a reasonable test range, but it is not a universal safe interval, especially across model architectures.
Build the Workflow
The essential chain is straightforward: load the base model and ControlNet weights, preprocess the reference image, apply the control to positive and negative conditioning, and send the resulting conditioning to KSampler.
Step 1: Load the Base Model
Node: Load Checkpoint
- Select the Stable Diffusion checkpoint.
- Record whether it is SD1.5, SDXL, or another architecture; the ControlNet must be compatible.
- Continue the base text-to-image graph with its
MODEL,CLIP, andVAEoutputs.
Step 2: Load the ControlNet Model
Node: Load ControlNet Model
- Select weights compatible with both the base-model architecture and the control-map type.
- The node provides the
CONTROL_NEToutput used by Apply ControlNet.
Step 3: Load and Preprocess the Reference Image
Nodes: Load Image plus a preprocessor such as OpenPose Preprocessor.
Load Image: upload the reference.- Preprocessor: turn it into a pose skeleton, edge map, or depth map.
- Comfy Core does not include every preprocessor. When needed, install
comfyui_controlnet_auxthrough ComfyUI Manager.
The preprocessed map is the structural signal that ControlNet reads. Preview it before continuing so missing limbs, broken edges, or flat depth do not become a downstream mystery.
Step 4: Connect Apply ControlNet
Node: Apply ControlNet
control_net: from Load ControlNet Model.image: from the preprocessor, not the unprocessed reference.positive: from positive prompt conditioning.negative: from negative prompt conditioning.strength: start at 1.0.start_percent: start at 0.end_percent: start at 1.
Apply ControlNet outputs new positive and negative conditioning. Connect both outputs to KSampler. If the sampler still receives the original prompt conditioning, the ControlNet is outside the sampling path.
Step 5: Generate and Compare
Node: KSampler
model: from Load Checkpoint.positive/negative: from Apply ControlNet.latent_image: from Empty Latent Image or another latent source.- Fix the seed before comparing the control on, off, or at different values; otherwise seed variation can hide the effect.
Check three connections before tuning:
- Both positive and negative pass through Apply ControlNet and reach the next node.
- The
imageinput receives the preprocessed map. - Early workflows may use
Apply ControlNet(Old), which is deprecated; use the standard Apply ControlNet node for current workflows.
Match the Base Model
SD1.5, SDXL, and FLUX ControlNet implementations and weights are not interchangeable. Identify the base model first, then choose weights explicitly documented for that architecture and workflow.
Preprocessor and Model Compatibility
| Preprocessor | Common SD1.5 weights | SDXL selection rule | FLUX selection rule |
|---|---|---|---|
| Canny | control_v11p_sd15_canny | Choose SDXL weights that explicitly accept a Canny map | Choose weights documented for the target FLUX base model and Canny |
| OpenPose / DWPose | control_v11p_sd15_openpose | Choose SDXL weights that explicitly accept pose keypoints | Choose weights documented for the target FLUX base model and Pose |
| Depth (MiDaS / LeReS) | control_v11f1p_sd15_depth | Choose SDXL weights that explicitly accept a depth map | Choose weights documented for the target FLUX base model and Depth |
| Scribble | control_v11p_sd15_scribble | Choose SDXL weights that explicitly accept a Scribble map | Check whether the specific model supports Scribble; do not assume every Union model does |
| SoftEdge (HED / PiDiNet) | control_v11p_sd15_softedge | Choose SDXL weights that explicitly accept a SoftEdge map | Check the model card and workflow for the corresponding soft-edge input |
Union models package several control modes into one set of weights and are one common choice in FLUX workflows. The supported modes, required nodes, and useful strengths depend on the exact model and workflow version. One community model’s filename and parameters are not universal FLUX rules.
Base-Model Compatibility Table
| Base model | How to select ControlNet | Directory | Caveat |
|---|---|---|---|
| SD1.5 | control_v11*_sd15_* is a common family | ComfyUI/models/controlnet | sd15 means the weights target SD1.5, not SDXL |
| SDXL | Use weights explicitly labeled for SDXL | ComfyUI/models/controlnet | A control type may have several authors and implementations; follow its model card |
| FLUX | Use ControlNet or Union weights explicitly compatible with the target FLUX base model | ComfyUI/models/controlnet | Nodes, modes, and strength ranges are model-specific; do not copy SD1.5 settings |
Choosing the Base Model
If you have not chosen a base model, start with the Stable Diffusion model selection guide. It compares model characteristics and resource needs; this section covers only ControlNet compatibility.
Where Should the Model File Go?
ControlNet weights normally live under ComfyUI/models/controlnet. After downloading them, restart ComfyUI or refresh the model list and select them in Load ControlNet Model.
When the folder grows, use subdirectories if your setup supports them. More importantly, keep the source and model-card link; a custom filename prefix is not reliable evidence of architecture compatibility.
Tune Multiple ControlNets
You can chain Apply ControlNet nodes when you need pose and composition at the same time. Verify each control by itself first. Otherwise, two independent failures become one confusing graph.

Chain Apply ControlNet Nodes
Connect the positive and negative conditioning outputs of the first Apply ControlNet to the matching inputs of the second.
-
First ControlNet:
- Load OpenPose weights and a pose control map.
- Test
strength=1.0,start_percent=0, andend_percent=0.7.
-
Second ControlNet:
- Load Depth weights and a depth control map.
- Start lower, for example
strength=0.6,start_percent=0, andend_percent=0.6.
-
Connection order:
- Prompt conditioning → first Apply ControlNet → second Apply ControlNet → KSampler.
- Keep positive and negative conditioning in the same order.
These values are troubleshooting baselines, not optimums. Pose and depth both describe large structures that form early, so start them at the beginning and distinguish their roles with strength and end position.
Tuning Principles
Start with two variables: priority and active range.
Set a clear priority:
- Test the primary control around 1.0.
- Start the secondary control lower, such as 0.5–0.7.
- If the image is pulled in incompatible directions, lower the secondary control before increasing both.
Set the active range:
- Composition and pose usually need early influence, so keep
start_percentat 0 initially. - Use different
end_percentvalues, such as 0.7 for the primary and 0.6 for the secondary. - When late details need more freedom, end a control earlier instead of moving it arbitrarily into the second half of diffusion.
Then check the following:
- Combining two controls of the same type is not forbidden, but two maps that describe the same structure often add conflict and tuning cost.
- Prefer complementary signals such as OpenPose + Depth or OpenPose + Canny.
- Fix the seed and compare one control with both controls.
- Do not start with both strengths set high.
- Change one parameter at a time and save a reproducible workflow.
- Do not add a second ControlNet until the first one has a visible effect.
Troubleshooting Checklist
| Problem | Likely cause | What to check |
|---|---|---|
| The image looks the same without ControlNet | The map is not connected, strength is near 0, KSampler still receives original conditioning, or the weights do not match the base model | Preview the map; inspect the Apply ControlNet image and conditioning chain; compare with a fixed seed; verify architecture compatibility |
| The pose or lines do not match | Wrong preprocessor, missing structure in the map, or insufficient influence | Inspect the skeleton or edge preview; try DWPose or Canny settings; raise strength gradually |
| The image is rigid or distorted | Strength is too high, the map is noisy, or control lasts through the final phase | Lower strength; clean the map; move end_percent from 1 to 0.8 or lower |
| The preprocessor node is missing | The custom node is not installed or a dependency failed to load | Find comfyui_controlnet_aux in ComfyUI Manager; install and restart; inspect startup logs for import errors |
| SDXL or FLUX weights fail or have no effect | The weights do not match the architecture or required node | Verify the base model, nodes, and example workflow in the model card; do not infer compatibility from a filename alone |
| Apply ControlNet(Old) is missing | The deprecated node is hidden by default | Replace it with standard Apply ControlNet; show deprecated nodes only when maintaining an old workflow |
| Multiple ControlNets conflict | The maps disagree, secondary strength is too high, or many parameters changed together | Test each control alone; fix the seed; lower secondary strength; shorten the active range; change one value at a time |
| Parameter changes appear to do nothing | The seed changes, the map lacks useful structure, or the conditioning chain bypasses ControlNet | Fix the seed and other sampler settings; preview the map; verify the source of KSampler’s positive and negative inputs |
Next Steps
ControlNet handles structural constraints that prompts cannot express precisely. Once the basic graph works, continue with these related guides:
- Install ComfyUI and navigate the interface: start here if ComfyUI is not installed or the interface is unfamiliar.
- Reuse and troubleshoot ComfyUI workflows: save, load, and fix missing nodes instead of rebuilding the graph each time.
- Build Stable Diffusion prompt templates: use ControlNet for structure and prompts for subject, style, and detail.
Build a basic ControlNet workflow in ComfyUI
Start with a base model and reference image, preprocess the structural signal, and add it to the sampling chain.
- 1
Step 1: Identify the base-model architecture
Determine whether the checkpoint is SD1.5, SDXL, or FLUX, then choose ControlNet weights explicitly compatible with it. - 2
Step 2: Load and preprocess the reference
Use OpenPose, Canny, or Depth to create a pose, edge, or depth control map. - 3
Step 3: Load the ControlNet weights
Place them under ComfyUI/models/controlnet and select the weights that match the preprocessor in Load ControlNet Model. - 4
Step 4: Connect Apply ControlNet
Connect positive, negative, control_net, and the preprocessed image, then send the output conditioning to KSampler. - 5
Step 5: Tune with a fixed seed
Test strength 1.0, start_percent 0, and end_percent 1 first, then change one value at a time. - 6
Step 6: Verify before chaining
Confirm each ControlNet works alone, then define primary and secondary controls and reduce the secondary strength or active range.
FAQ
What is the difference between OpenPose and DWPose?
What ControlNet strength should I use?
What do start_percent and end_percent mean?
Can I use more than one ControlNet?
Which ControlNet should I use with FLUX?
11 min read · Published on: Jul 19, 2026 · Modified on: Jul 19, 2026

ComfyUI & Stable Diffusion: Setup, Models, and Workflows
If you landed here from search, the fastest way to build context is to jump to the previous or next post in this same series.
Previous
Stable Diffusion Prompt Template Guide: Product Photos, Avatars, Posters, and Game Assets
Don't know how to write Stable Diffusion prompts? This guide breaks down positive prompts, negative prompts, weight syntax, ComfyUI iteration, and commercial license checks across four practical scenarios: product photos, avatars, posters, and game assets.
Part 4 of 16
Next
Using LoRA in ComfyUI: Loading, Weights, Stacking, and Character Consistency
Load LoRA files in ComfyUI, tune strength_model and strength_clip, stack multiple LoRAs, match the base model, reduce character drift, and troubleshoot weak results.
Part 6 of 16


Comments
Sign in with GitHub to leave a comment