
Cocos 小游戏角色移动与攻击:从节点到动画的实现
你的角色站在屏幕中央,按下方向键——一动不动。打开代码一看,移动逻辑、动画播放、状态判断全部堆在一个 update 函数里,改了动画忘记改状态,改了状态忘记改速度,最后连自己都不知道角色现在应该干什么。
节点分离听起来有点抽象,说白了就是把移动和动画拆开管——Player节点负责水平位移,Body节点处理垂直跳跃和攻击动画,两者独立运行,互不干扰。这篇文章带你从节点架构开始,逐步完成动画组件配置、状态机实现、输入控制方案选型,最后给出一套完整的横版格斗角色代码。
角色节点架构设计 — 水平移动 + 垂直动画叠加
Cocos Creator 3.7 的官方教程有个容易被忽略的设计:Player 和 Body 两个节点分离。很多人(包括我一开始)觉得这没必要,直接用一个节点管移动、动画、碰撞检测不也挺简单吗?
问题出在动画和移动的节奏不一致。想象你的角色正在跳跃——水平方向匀速向前飞,垂直方向却在画抛物线。如果用单一节点,update 里既要算水平位移又要控制跳跃高度,代码写着写着就乱了。等到加入攻击动画、受击特效、甚至死亡时的旋转缩放,单一节点的逻辑基本失控。
节点分离的好处:移动归移动,动画归动画。Player节点只管 x 坐标的增减,Body节点只管 y 坐标的跳跃和动画帧切换,两者互不抢戏。
节点结构示意:
Player(根节点)
  ├── PlayerControl.ts(移动逻辑)
  └── Body(子节点)
       ├── Sprite(角色图片)
       └── Animation组件
代码示例 — Player节点移动控制:
// PlayerControl.ts - Player节点脚本
@property(CCFloat)
speed: number = 200; // 移动速度

private moveDir: Vec2 = new Vec2(0, 0);

update(dt: number) {
  if (this.moveDir.mag() > 0.5) {
    const vx = this.moveDir.x * this.speed;
    this.node.x += vx * dt; // 只改水平位置
  }
}

// 外部调用设置方向
setMoveDir(dir: Vec2) {
  this.moveDir = dir;
}
代码示例 — Body节点动画控制:
// BodyControl.ts - Body节点脚本
@property(Animation)
animation: Animation = null;

jump(height: number = 100) {
  // 跳跃动画:垂直位移 + jump动画帧
  this.node.runAction(cc.jumpBy(1.0, 0, 0, height, 1));
  this.animation.play('jump');
}

attack() {
  this.animation.play('attack');
  // 攻击结束后自动回到idle
  this.scheduleOnce(() => {
    this.animation.play('idle');
  }, 0.5);
}
这样一来,移动逻辑在 Player 节点,动画逻辑在 Body 节点,改跳跃高度不用碰移动代码,改移动速度也不用去动画脚本里翻找——代码维护轻松了不少。
动画组件配置 — Animation + AnimationClip 绑定
动画组件是 Cocos Creator 的内置模块,但你可能没注意到它有几个关键属性:defaultClip、clips 数组、还有个容易被忽略的 playOnLoad。
Animation 组件的核心属性:
defaultClip:默认播放的动画(通常是站立动画)clips:动画资源数组(站立、行走、攻击等 AnimationClip)currentClip:当前正在播放的动画(运行时状态)
配置步骤挺简单:
- 在 Body 节点添加 Animation 组件
- 把 AnimationClip 资源拖进 clips 数组
- 设置 defaultClip 为站立动画
- 勾选 playOnLoad(让角色一开始就站立)
代码示例 — 动画组件配置:
// PlayerAnimation.ts - 动画控制脚本
@property(Animation)
animation: Animation = null;

@property([AnimationClip])
clips: AnimationClip[] = []; // 站立、行走、攻击、跳跃

onLoad() {
  this.animation.clips = this.clips;
  this.animation.defaultClip = this.clips[0]; // 默认站立
  this.animation.play();
}

playIdle() { this.animation.play('idle'); }
playMove() { this.animation.play('move'); }
playAttack() {
  this.animation.play('attack');
  this.scheduleOnce(() => { this.playIdle(); }, 0.5);
}
有个细节:动画切换时最好先 stop() 再 play(),尤其是攻击动画这类”一次性播放”的片段。不这么做的话,角色正在行走时按下攻击键,攻击动画可能会和行走动画抢帧——画面看起来就像角色一边挥刀一边滑步,挺怪异的。
动画切换的正确方式:
switchAnimation(name: string) {
  if (this.animation.currentClip?.name !== name) {
    this.animation.stop();
    this.animation.play(name);
  }
}
动画组件配置完,下一步是状态机——让动画切换有规律,而不是到处散落 if (速度>0) play('move') 这类判断。
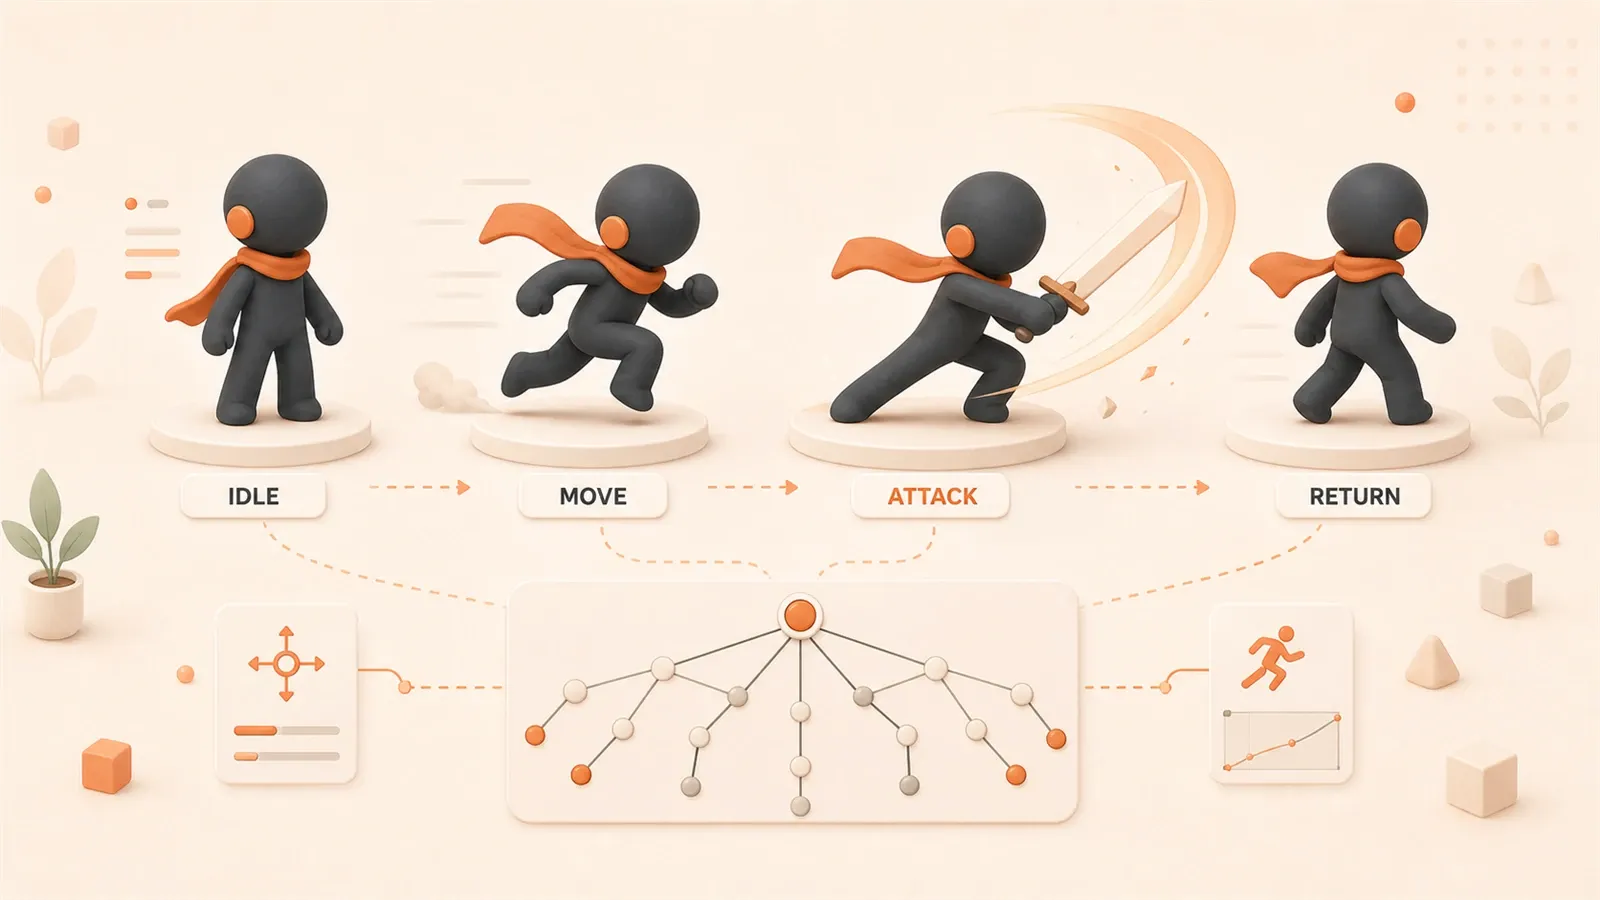
动画状态机驱动 — 待机 → 移动 → 攻击 → 返回待机
状态机的核心思想:角色在任何时刻只能处于一个状态(idle、move、attack),状态之间有明确的过渡条件。不是随便切换,而是有章有法。
我一开始也觉得状态机有点过度设计——不就是播放动画嘛,直接 play('attack') 不就完了?后来加了跳跃状态,又加了受伤状态,最后发现状态切换的判断到处散落:移动脚本里有判断,动画脚本里有判断,输入处理里还有判断。改了一处判断逻辑,另外两处忘了同步更新,角色行为就开始出bug。
状态机流转图:
[Entry] → [idle]
          ↓ speed>0
         [move]
          ↓ attackKey
         [attack] → [Exit] → [idle]
三个状态:idle(待机)、move(移动)、attack(攻击)。过渡条件:
- idle → move:速度大于0
- move → idle:速度为0
- any → attack:按下攻击键
- attack → idle:攻击动画结束
代码示例 — 状态机实现:
// PlayerStateMachine.ts
enum State {
  Idle = 'idle',
  Move = 'move',
  Attack = 'attack'
}

@property(Animation)
animation: Animation = null;

private currentState: State = State.Idle;
private isMoving: boolean = false;
private attackKeyPressed: boolean = false;

switchState(newState: State) {
  if (this.currentState === newState) return; // 防重复
  this.animation.stop();
  this.animation.play(newState);
  this.currentState = newState;
}

update(dt: number) {
  // 移动状态判断
  if (this.isMoving && this.currentState !== State.Move) {
    this.switchState(State.Move);
  } else if (!this.isMoving && this.currentState !== State.Idle) {
    this.switchState(State.Idle);
  }

  // 攻击状态(优先级高于移动)
  if (this.attackKeyPressed && this.currentState !== State.Attack) {
    this.switchState(State.Attack);
    this.scheduleOnce(() => { this.switchState(State.Idle); }, 0.5);
  }
}

setMoving(value: boolean) { this.isMoving = value; }

triggerAttack() {
  this.attackKeyPressed = true;
  this.scheduleOnce(() => { this.attackKeyPressed = false; }, 0.1);
}
状态机的关键细节:

- 状态优先级:攻击优先于移动(攻击时不能移动)
- 防重复切换:
if (currentState === newState) return避免同一状态重复播放 - 定时器回调:攻击动画结束后自动回到idle,而不是等按键释放
状态机把动画切换的逻辑集中到一处,修改过渡条件只改一处代码。后续要加跳跃、受伤、死亡状态,也只是往 State 枚举里加几个值,再补充过渡条件——扩展性比散乱的 if 判断强太多。
输入控制方案对比 — 键盘 vs 触摸 vs 虚拟摇杆
三种方案各有适用场景,选错了会让操作手感大打折扣。
| 方案 | 适用场景 | 优点 | 缺点 | 实现复杂度 |
|---|---|---|---|---|
| 键盘 | PC端、调试阶段 | 简单直接,响应快 | 手机端不可用 | 低 |
| 触摸 | 全屏移动游戏(飞行、跑酷) | 操作自然,无UI遮挡 | 方向精度低,容易误触 | 中 |
| 虚拟摇杆 | ARPG、格斗游戏 | 方向精确,360度控制 | UI占用屏幕空间 | 高 |
键盘输入(PC端首选)
如果你的小游戏主要在PC端运行,或者调试阶段快速验证逻辑,键盘是最简单的方案。
代码示例 — 键盘输入:
// KeyboardInput.ts
private moveDir: Vec2 = new Vec2(0, 0);

onLoad() {
  input.on(Input.EventType.KEY_DOWN, this.onKeyDown, this);
  input.on(Input.EventType.KEY_UP, this.onKeyUp, this);
}

onKeyDown(event: EventKeyboard) {
  switch (event.keyCode) {
    case KeyCode.KEY_A:
    case KeyCode.ARROW_LEFT:
      this.moveDir.x = -1; break;
    case KeyCode.KEY_D:
    case KeyCode.ARROW_RIGHT:
      this.moveDir.x = 1; break;
    case KeyCode.KEY_J:
      this.playerStateMachine.triggerAttack(); break;
  }
}

onKeyUp(event: EventKeyboard) {
  switch (event.keyCode) {
    case KeyCode.KEY_A:
    case KeyCode.ARROW_LEFT:
    case KeyCode.KEY_D:
    case KeyCode.ARROW_RIGHT:
      this.moveDir.x = 0; break;
  }
}

update(dt: number) {
  this.playerControl.setMoveDir(this.moveDir);
  this.playerStateMachine.setMoving(this.moveDir.mag() > 0.5);
}
键盘输入的细节:
- 按键映射:A/D 和 左/右箭头同时支持,适配不同玩家习惯
- 攻击键:J 键(格斗游戏常用)
- 状态同步:每帧更新移动方向和状态机
虚拟摇杆(移动端首选)
如果你的小游戏是手机端运行,而且是横版格斗、ARPG这类需要精确方向控制的游戏,虚拟摇杆几乎是必选项。
虚拟摇杆的实现要点:
- 边界限制:摇杆中心不能超出背景圆的范围
- 方向归一化:返回单位向量
- 触摸释放:摇杆自动回到中心点
代码示例 — 虚拟摇杆实现:
// Joystick.ts
@property(Node)
joystickBg: Node = null;

@property(Node)
joystickHandle: Node = null;

@property(CCFloat)
radius: number = 100;

private moveDir: Vec2 = new Vec2(0, 0);

onLoad() {
  input.on(Input.EventType.TOUCH_MOVE, this.onTouchMove, this);
  input.on(Input.EventType.TOUCH_END, this.onTouchEnd, this);
}

onTouchMove(event: EventTouch) {
  const touchPos = event.getUILocation();
  const localPos = this.joystickBg.inverseTransformPoint(
    v3(), v3(touchPos.x, touchPos.y, 0)
  );

  const distance = localPos.length();
  if (distance > this.radius) {
    localPos.x = this.radius * localPos.x / distance;
    localPos.y = this.radius * localPos.y / distance;
  }

  this.joystickHandle.setPosition(localPos);
  this.moveDir = v2(localPos.x, localPos.y).normalize();
}

onTouchEnd() {
  this.joystickHandle.setPosition(Vec3.ZERO);
  this.moveDir = v2(0, 0);
}

getMoveDir(): Vec2 { return this.moveDir; }
虚拟摇杆的关键细节:
- 坐标转换:用
inverseTransformPoint把屏幕坐标转为节点本地坐标 - 半径限制:
if (distance > radius)确保摇杆不超出背景圆 - 归一化:
normalize()返回单位向量,方便移动脚本直接乘速度
如果你做的是飞行类、跑酷类游戏(不需要精确方向),可以用全屏触摸——手指在屏幕任意位置滑动都控制角色移动。但这类游戏的输入逻辑和虚拟摇杆不同,需要根据游戏类型调整。
实战案例 — 横版格斗角色控制完整实现
把前面的节点架构、动画配置、状态机、输入控制整合成一个完整的横版格斗角色控制方案。
完整代码结构:

Player(根节点)
  ├── PlayerControl.ts(移动控制)
  ├── PlayerStateMachine.ts(状态机)
  └── KeyboardInput.ts(键盘输入)

Body(子节点)
  ├── Sprite(角色图片)
  ├── Animation组件
  └ AttackEffect(攻击特效节点,可选)
完整代码示例 — PlayerControl.ts:
import { _decorator, Component, Node, Vec2, CCFloat } from 'cc';
const { ccclass, property } = _decorator;

@ccclass('PlayerControl')
export class PlayerControl extends Component {
  @property(CCFloat)
  speed: number = 200;

  private moveDir: Vec2 = new Vec2(0, 0);

  update(dt: number) {
    if (this.moveDir.mag() > 0.5) {
      const vx = this.moveDir.x * this.speed;
      this.node.x += vx * dt;
    }
  }

  setMoveDir(dir: Vec2) { this.moveDir = dir; }
}
完整代码示例 — PlayerStateMachine.ts:
import { _decorator, Component, Animation } from 'cc';
const { ccclass, property } = _decorator;

enum State {
  Idle = 'idle',
  Move = 'move',
  Attack = 'attack'
}

@ccclass('PlayerStateMachine')
export class PlayerStateMachine extends Component {
  @property(Animation)
  animation: Animation = null;

  private currentState: State = State.Idle;
  private isMoving: boolean = false;
  private attackKeyPressed: boolean = false;

  onLoad() { this.animation.play('idle'); }

  switchState(newState: State) {
    if (this.currentState === newState) return;
    this.animation.stop();
    this.animation.play(newState);
    this.currentState = newState;
  }

  update(dt: number) {
    if (this.isMoving && this.currentState !== State.Move) {
      this.switchState(State.Move);
    } else if (!this.isMoving && this.currentState !== State.Idle) {
      this.switchState(State.Idle);
    }

    if (this.attackKeyPressed && this.currentState !== State.Attack) {
      this.switchState(State.Attack);
      this.scheduleOnce(() => { this.switchState(State.Idle); }, 0.5);
    }
  }

  setMoving(value: boolean) { this.isMoving = value; }
  triggerAttack() {
    this.attackKeyPressed = true;
    this.scheduleOnce(() => { this.attackKeyPressed = false; }, 0.1);
  }
}
完整代码示例 — KeyboardInput.ts:
import { _decorator, Component, input, Input, EventKeyboard, KeyCode, Vec2 } from 'cc';
import { PlayerControl } from './PlayerControl';
import { PlayerStateMachine } from './PlayerStateMachine';
const { ccclass, property } = _decorator;

@ccclass('KeyboardInput')
export class KeyboardInput extends Component {
  @property(PlayerControl)
  playerControl: PlayerControl = null;

  @property(PlayerStateMachine)
  stateMachine: PlayerStateMachine = null;

  private moveDir: Vec2 = new Vec2(0, 0);

  onLoad() {
    input.on(Input.EventType.KEY_DOWN, this.onKeyDown, this);
    input.on(Input.EventType.KEY_UP, this.onKeyUp, this);
  }

  onDestroy() {
    input.off(Input.EventType.KEY_DOWN, this.onKeyDown, this);
    input.off(Input.EventType.KEY_UP, this.onKeyUp, this);
  }

  onKeyDown(event: EventKeyboard) {
    switch (event.keyCode) {
      case KeyCode.KEY_A:
      case KeyCode.ARROW_LEFT:
        this.moveDir.x = -1; break;
      case KeyCode.KEY_D:
      case KeyCode.ARROW_RIGHT:
        this.moveDir.x = 1; break;
      case KeyCode.KEY_J:
        this.stateMachine.triggerAttack(); break;
    }
  }

  onKeyUp(event: EventKeyboard) {
    switch (event.keyCode) {
      case KeyCode.KEY_A:
      case KeyCode.ARROW_LEFT:
      case KeyCode.KEY_D:
      case KeyCode.ARROW_RIGHT:
        this.moveDir.x = 0; break;
    }
  }

  update(dt: number) {
    this.playerControl.setMoveDir(this.moveDir);
    this.stateMachine.setMoving(this.moveDir.mag() > 0.5);
  }
}运行效果:
- 启动游戏 → 角色站立动画播放
- 按下 A/D 或 左/右箭头 → 角色移动 + 行走动画
- 按下 J键 → 角色攻击 + 攻击动画 → 0.5秒后回到站立
- 释放方向键 → 角色停止移动 + 站立动画
常见问题与解决方案:
- 动画切换卡顿:检查 AnimationClip 的帧率是否过低(建议 12-24fps)
- 状态残留:攻击动画结束后没有回到idle,检查定时器回调是否正常执行
- 输入冲突:攻击时角色还在移动,检查状态机里是否把攻击状态优先级放在移动判断之前
完整代码整合后,角色控制逻辑清晰:移动归 PlayerControl,动画归 StateMachine,输入归 KeyboardInput,三个脚本通过接口通信,互不干扰。
总结
核心架构就三层:
- 节点分离:Player管移动,Body管动画,互不抢戏
- 状态机:idle、move、attack三个状态,过渡条件清晰集中
- 输入控制:PC端用键盘,移动端用虚拟摇杆,根据游戏类型选方案
这三层架构的好处:改一处不影响另一处。移动速度调快了,动画逻辑不用改;攻击动画加特效,移动脚本不用改;输入换成虚拟摇杆,状态机逻辑不用改。
下一步,你可以结合本系列第4篇《小游戏状态机设计》的三层嵌套架构,为角色添加更复杂的状态管理——比如跳跃、受伤、死亡、技能释放等。角色状态机只是游戏状态机的一个子模块,扩展起来思路是一样的:定义状态、设置过渡条件、集中管理切换逻辑。
Cocos Creator 角色移动与攻击实现流程
从节点架构设计到输入控制,完整实现横版格斗角色控制
⏱️ 预计耗时: 45 分钟
- 1
步骤 1: 设计节点架构
创建 Player 根节点挂载移动控制脚本,创建 Body 子节点挂载动画组件和 Sprite。Player 只控制 x 坐标的增减,Body 处理 y 坐标的跳跃和动画帧切换。 - 2
步骤 2: 配置动画组件
在 Body 节点添加 Animation 组件,拖入站立、行走、攻击等 AnimationClip 资源。设置 defaultClip 为站立动画,勾选 playOnLoad。在代码中通过 animation.play('clipName') 切换动画。 - 3
步骤 3: 实现状态机
定义 State 枚举(Idle、Move、Attack),实现 switchState 方法。在 update 中根据 isMoving 和 attackKeyPressed 判断状态切换,攻击状态用 scheduleOnce 定时器在 0.5 秒后回到 idle。 - 4
步骤 4: 接入输入控制
创建 KeyboardInput 脚本监听 KEY_DOWN 和 KEY_UP 事件。A/D 和左右箭头控制移动方向,J 键触发攻击。在 update 中每帧同步 moveDir 到 PlayerControl 和 StateMachine。 - 5
步骤 5: 测试与调优
运行游戏验证:站立动画播放正常,方向键按下角色移动并切换行走动画,攻击键触发攻击动画后自动回到站立,动画切换流畅无卡顿。
常见问题
为什么要把 Player 和 Body 分成两个节点?
动画切换时角色一边挥刀一边滑步,怎么解决?
攻击动画结束后角色还在播放攻击帧,没有回到站立动画?
PC端和移动端应该选择哪种输入方案?
虚拟摇杆的边界限制和归一化怎么实现?
状态机的攻击状态为什么要用定时器回到 idle,而不是等按键释放?
12 分钟阅读 · 发布于: 2026年5月21日 · 修改于: 2026年7月14日


评论
使用 GitHub 账号登录后即可评论